Here we are at the final installment, part 4 of the making of Elmo. Wow, I certainly didn’t intend for it to be anywhere near this long when I started. In Part 1 I talked about planning the cake, making the stand and making the icing. Part 2 covered making and carving the cakes. In Part 3, rice crispies were made and molded into arms, legs, eyes and nose, and blocks and toys were created.
Since last time, the carved cake and rice crispies arms and legs have been in the freezer, firming up the rice crispies. The eyes, nose and blocks have been covered with fondant and overnight you’ll notice they’ve hardened quite a bit since making them, hard enough that you can easily handle them without fear of putting dents in them. If you’ve made them a few days in advance, by the time you get to this stage they’ll be very firm. Finally the cake is almost ready for the final coat of icing, the fur, but first we need to make the smash cake.
Smash Cake
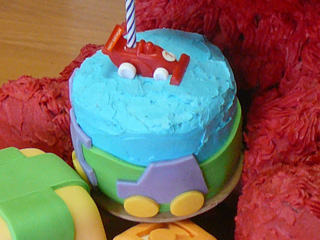 You can really do anything with this cake that you like, decorate it however you want. I based mine on a cute cake I’d seen online, but running out of time, I rushed it. I would have liked to put a bit more time into it. I also had special requirements for this smash cake, as the birthday boy has lots of food allergies. The cake was gluten free, and the butter cream icing was made from special margarine. The fondant was designed so it could be easily pulled off before serving. All these considerations went into the design of the cake, but you can do whatever takes your fancy. It’s quite fun making a mini cake like this.
The reason for making the smash cake first, is that we’ll put it in place as the fur icing is being done. It’s quite a tight fit, and would be too easy to scrape and stuff up the fur if you put it on afterwards.
So grab the mini cake board (which can be prepared by covering with wrapping paper, contact or just foil) put down a generous dollup of icing and put the cakes on, giving them a filling/crumb coat layer, and put them in the freezer for 1/2 hour or more to set the crumb coat. Then go ahead and decorate just like you would with any other cake.
Before decorating it may be worth pushing the cake down on the dowel, or you may want to wait until later. If you do it first then when you put the finished cake in place you won’t disturb the icing too much, but it’ll still be frozen, so you could split it. If you wait till later the dowel will more easily go through the cake, but you’ll need to push down quite hard putting a hole in the icing (which can be covered up by a candle, or more icing, or another decoration). If your cake is sitting flat instead of on an angle like mine, then you can just dig a hole through the center with a knife. I waited and pushed the cake onto the dowel after decorating, then fixed the hole.
Preparing for the Fur
If you’ve made the icing a few days in advance, you’ll be glad to have the space back in your fridge. Take out the icing a couple of hours before you plan to start to give it time to thaw. It will be quite solid, especially if you’ve made if from copha/shortening. While it’s thawing we can prepare the cake.
Arms and Legs
The arms and legs should be set nicely by now. If you need to you can carve or shave the legs and feet if there are any bits sticking out, or too bulky. Test each arm in place and make any adjustments necessary. Thin the shoulders so they merge nicely with the body at the top, and make sure the arms/hands will fit under the smash cake. When any adjustments have been made, press each arm into the body, bending slightly if necessary, until it sticks in place. The arms may also rest on the legs a bit, giving them extra support.
It’s up to you whether you do this or not, but I quickly covered the arms and legs with a layer of my crumb coat icing, just so that if there ended up any small gaps in the fur that the light colored rice crispies wouldn’t shine through.
Elmo’s Mouth
I mentioned in the beginning that you could buy or make fondant for the inside of Elmo’s mouth. You can buy chocolate fondant from most supermarkets, which you can leave as is, or color black. Because it’s already dark brown it won’t need much coloring. I had some chocolate fondant I’d made for the Lion’s mane left over, so I used that, and didn’t bother coloring it black.
Black Fondant or Icing
If you want to make black fondant or icing, it’s usually recommended that you start with chocolate fondant or icing. The natural brown color of the cocoa means it’ll take a lot less coloring to make black than if you start with white icing.
Perhaps an easier alternative if you really need black, is purchasing ready made black fondant or icing from a baking or cake decorating store.
I also wanted to mention an alternative to using fondant for the mouth. You could quite easily use butter cream icing instead of fondant. If you have some black coloring gel, you can make some rich chocolate butter cream icing, and darken it with black coloring. Since the cake will still be frozen at this point, the icing will set very quickly, making it easier to get a nice smooth surface without having wait for it to crust.
Whichever method you choose, make sure you cover the mouth before starting the fur, as the fur will cover the edge of the fondant or icing. If making it out of fondant, you’ll need to roll out a circle big enough to cover the inside of the mouth. Bend it in half and place the bent edge at the back of the mouth. Lift the top half and press into the top of the mouth, and smooth the bottom half over the bottom of the mouth. Cut the fondant along the edges of the mouth, starting with the top edge. Push the fondant into the crease at the back of the mouth, making sure the fondant is nice and tight on the cake.
Piping the Fur
When planning the fur, I was torn between using a star or a grass tip for piping the icing. The star tip would create what looks like clumps of fur that I thought would look quite good. On the other hand, the grass tip would create fine strands that might look more like fur, but perhaps less of a clumped look. I had hoped to experiment a bit, but as I was running short on time I went with the star, thinking that would be the quicker option.
A couple of warnings before we get started. Piping fur is very, very repetitive, and tedious, and time consuming. You’ll likely get tired hands and wrists, possibly cramping a bit by the end. Make sure you leave enough time to do it without staying up all night. You’ll need some music, tv or something equally distracting so you don’t get bored to bits. You’ll also end up with very red hands and fingers from the red coloring, so you may want to use gloves, but as long as you’re doing it the day before the party there’ll be plenty of time to wash it off before the event.
 When piping the fur you need to start at the bottom and work up. This way each layer of fur overlays the previous layer/s as it should. Also don’t make the fur strands or clumps too regular. Mix up the lines as you go, start each one a bit higher or lower, and make each one go in a slightly different direction. The more variation you can get in there, the more natural the fur will look. Take your time with each stroke, making sure to finish each one before moving up for the next. If you try and do it too quickly (which I almost guarantee you will a few times towards the end, when you just can’t wait to be finished) it will end up a mess and not look at all like fur. Even doing each stroke carefully, you’ll work up a rhythm and be much faster towards the end than you started.
One more note on the color. I found that as the icing warmed, the color deepened. This meant that icing that I’d piped on, that had run through the warmth of my hands, was a deeper red than icing that I spread on with a spatula. It also meant that the earlier parts of the fur were a bit lighter in color than the later parts. It’s something to watch out for each time you need to fill up the piping bag as well, as the first few strokes will be lighter in color. Perhaps there’s a way to warm the icing consistently to get the color the same all through, I’m not sure. I ended up doing the first few strokes of each new bag on the back, so the front stayed fairly consistent in color.
When the fur has thawed a bit (I left mine in the sun for an hour or so), get out your beaters and whip it up again. When it’s back close to its original consistency you can put some in a piping bag and get ready to start.
Start by piping some icing in the areas that will end up under the smash cake, the lower part of the tummy, the hands and the inside of the legs. I just piped it in roughly and spread it with a knife, as it’ll be mostly covered with the smash cake so doesn’t need the fur texture. Any parts I did this for, I kept the surface quite rough, so what was visible didn’t look too different to the proper fur. When those areas are covered, take your decorated smash cake and push it down onto the dowel and into position.
Now you can start on the fur, being careful to avoid the smash cake when you’re near it. I recommend starting at the front and working your way to the back (just in case you start to run low on icing towards the end as I did), remembering to always work from the bottom up. You can do it in sections created naturally by the forms of the character. The tummy up to the bottom of the mouth can be done separately, the arms and legs can be done separately. Any parts that are tricky to get to with the piping nozzle, like the underside of the legs, can be spread roughly with a spatula or knife.
As you go, keep in mind which way the fur would naturally flow, working up stream so to speak. So work from the bottom of arms to the top, from the feet up the legs to the body, etc. It’s useful to find a few photos of Elmo to see how his actual fur flows. You’ll see it’s usually combed to the sides above his mouth which will affect how you do the icing there.
Final Touches
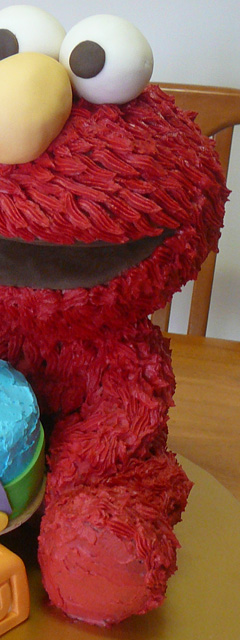
When you’ve finally finished piping the fur, with your hands still aching, fumble about for the eyes and nose you made earlier. Trying to keep your hands from shaking too much, push the eyes and nose gently, but firmly into position on the top of the head. Check my plan for the proper positioning, as correct placement of the eyes and nose makes a big difference in how much the final cake looks like Elmo.
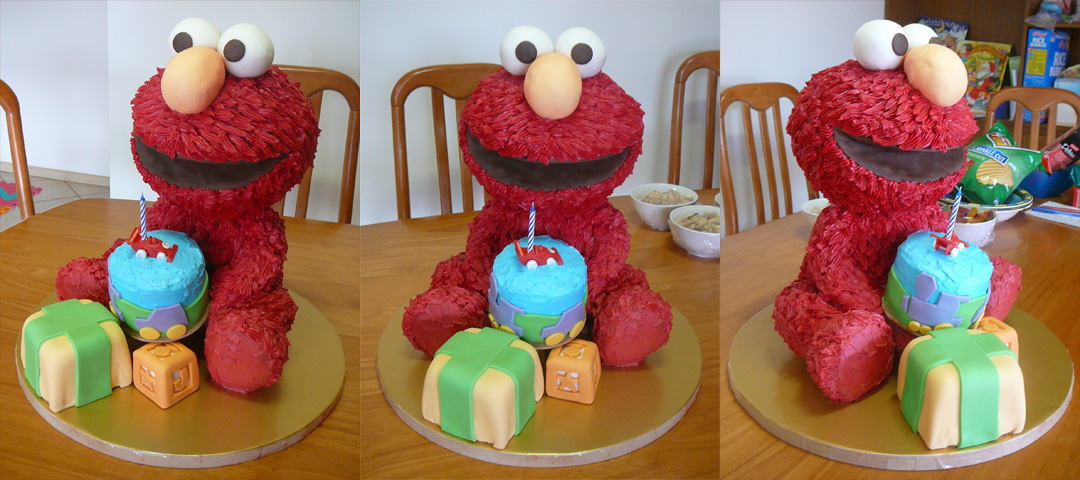
Finally, position the blocks and toys in front of the smash cake, hiding the supports.
Alternative Techniques
As I mentioned a few times there are always alternative ways to do things, some are easier, others are just, well, different. There’s no right or wrong way to do any of this, you just do whatever suits your particular cake design and other requirements.
Smaller Elmo
You may want to make a smaller Elmo, possibly even sitting on another cake. If your Elmo is smaller than this one, your stand may not need to be quite so sturdy or complex. If the cake he’s sitting on is tall enough, you may not even need to secure the dowels to the board. Pushing the dowels down into the lower cake may provide enough support. Just make sure you use supports under Elmo so he doesn’t fall into the underlying cake.
If you wanted a small Elmo on another cake you could make him entirely out of rice crispies. Indeed someone else has provided instructions for one way of doing this at Cakes Canada
Arms and Legs
I mentioned when talking about the stand, that you could do away with the wire support by placing the legs flat on the board instead of having the knees raised, or if you’re making a smaller Elmo sitting on another cake. You could just mold the rice crispies straight on the board or a bench, and move them into position when you start icing. You don’t even have to use rice crispies for the arms and legs at all.
You could make them out of cake, and skewer the arms in place. You could make them out of fondant if you have enough, or if your Elmo is smaller than mine. If your Elmo is small enough you could even make the insides and outsides of the arms and legs out of butter cream icing. If you really wanted you could even use polystyrene.
Head
Instead of cake, if you didn’t need to serve too many people, or if you choose to have your Elmo sitting on another cake, you could make the head out of rice crispies (or polystyrene). That would mean you wouldn’t need the support disk in the middle to hold the mouth up.
Smash Cake
Instead of including a dowel to hold up the smash cake board, you could hold it up with more cake, or a block of polystyrene, or a block of wood. Since it’s pretty well hidden you could use almost anything. If I were making an Elmo sitting on another cake, I’d probably hold it up with cake, and the icing would stop it slipping.
As you can see there are many different ways to accomplish the same thing, and many different things you can do. My aim with this tutorial has been not just to show you how I made Elmo, but to explain some of the techniques I’ve used when making cakes like this. I hope that this will give you the confidence and knowledge to make all sorts of different 3D cakes, not just Elmo. The only limit is our imagination.
If you’d like to see more of my cakes or tutorials, as well as what I have on my blog, I have posted some photo tutorials on Flickr.
If you’ve been inspired by this tutorial I’d love to hear from you, and would love to see any cakes made as a result. As always, if you have any comments or questions please feel free to leave them below.