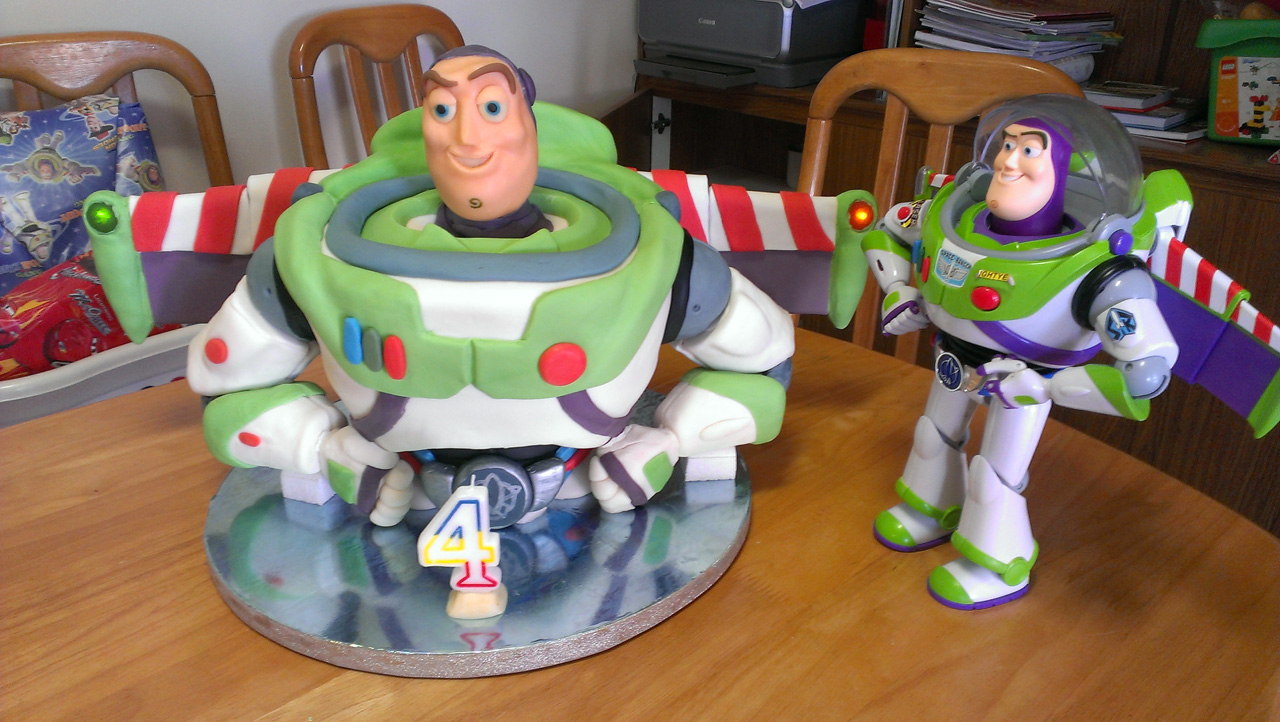
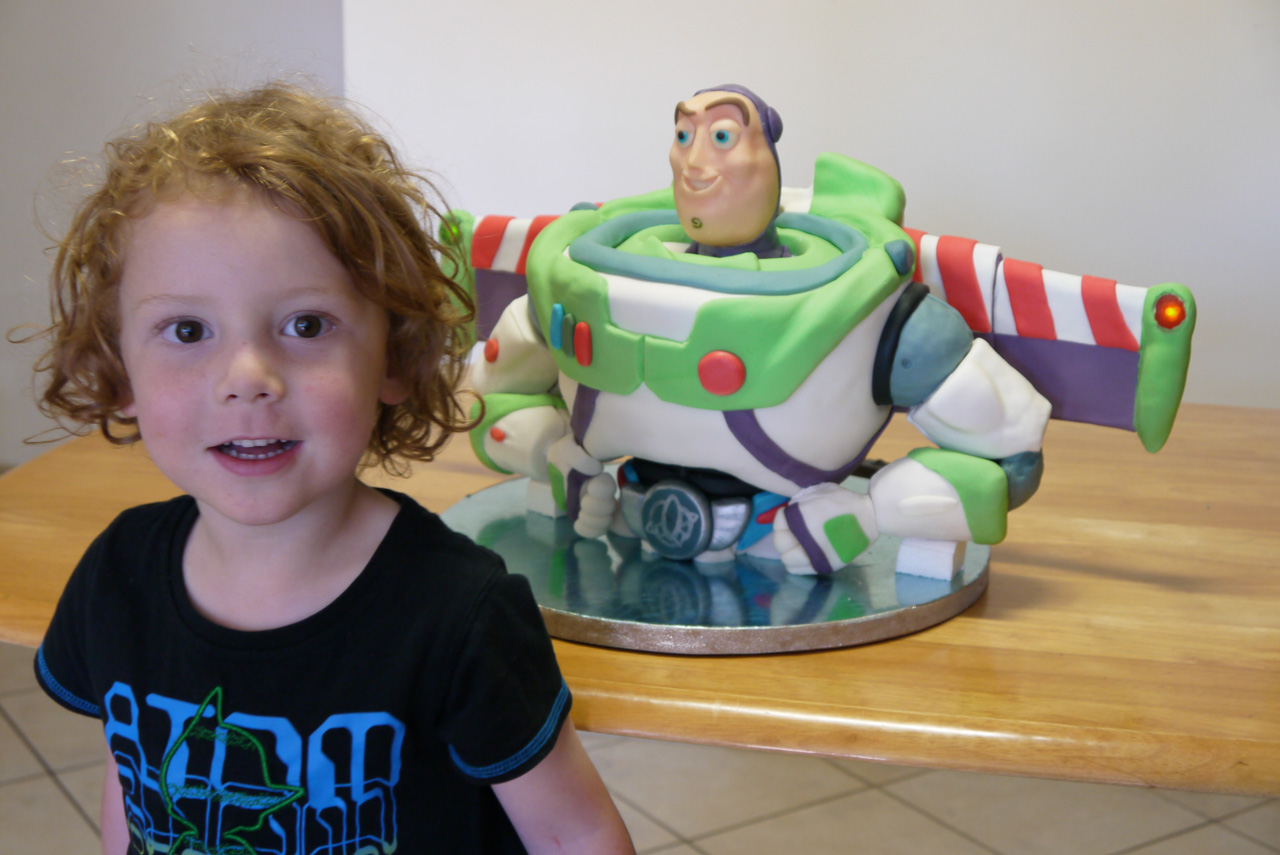
 For the last year Seb has been obsessed by Buzz Lightyear, but not just any Buzz Lightyear – Buzz Lightyear from Toy Story 2, with the anti-gravity belt (or the rocket button as Seb calls it). So I’ve known for a long time that this years birthday cake would be Buzz Lightyear.
It was a busy time of year, so I wasn’t able to dedicate all of my time to it as I like to do. It turned out that we also had to be away the night before the party, usually the time when I’m doing all the last minute decorating. Rushing a cake like this tends to lead to poor decisions and mistakes, and this one was no exception. The biggest mistake I made though, was in the planning. I totally underestimated the weight of, well, the whole thing really. Having two 38 degree days right in the middle of the week didn’t help either – far from ideal weather for cake making. We have air conditioning, but the main aircon is evaporative which cakes don’t like. But enough excuses, let’s get to the cake.
Design
Designing the cake was slightly complicated by the fact that it had to have the rocket button. I would have preferred to have less of the torso showing, having the cake start at the chest, but Seb wanted to be able to eat the rocket button. So it was top heavy, but I’d made top heavy cakes before so i didn’t think it would be too big a big problem.
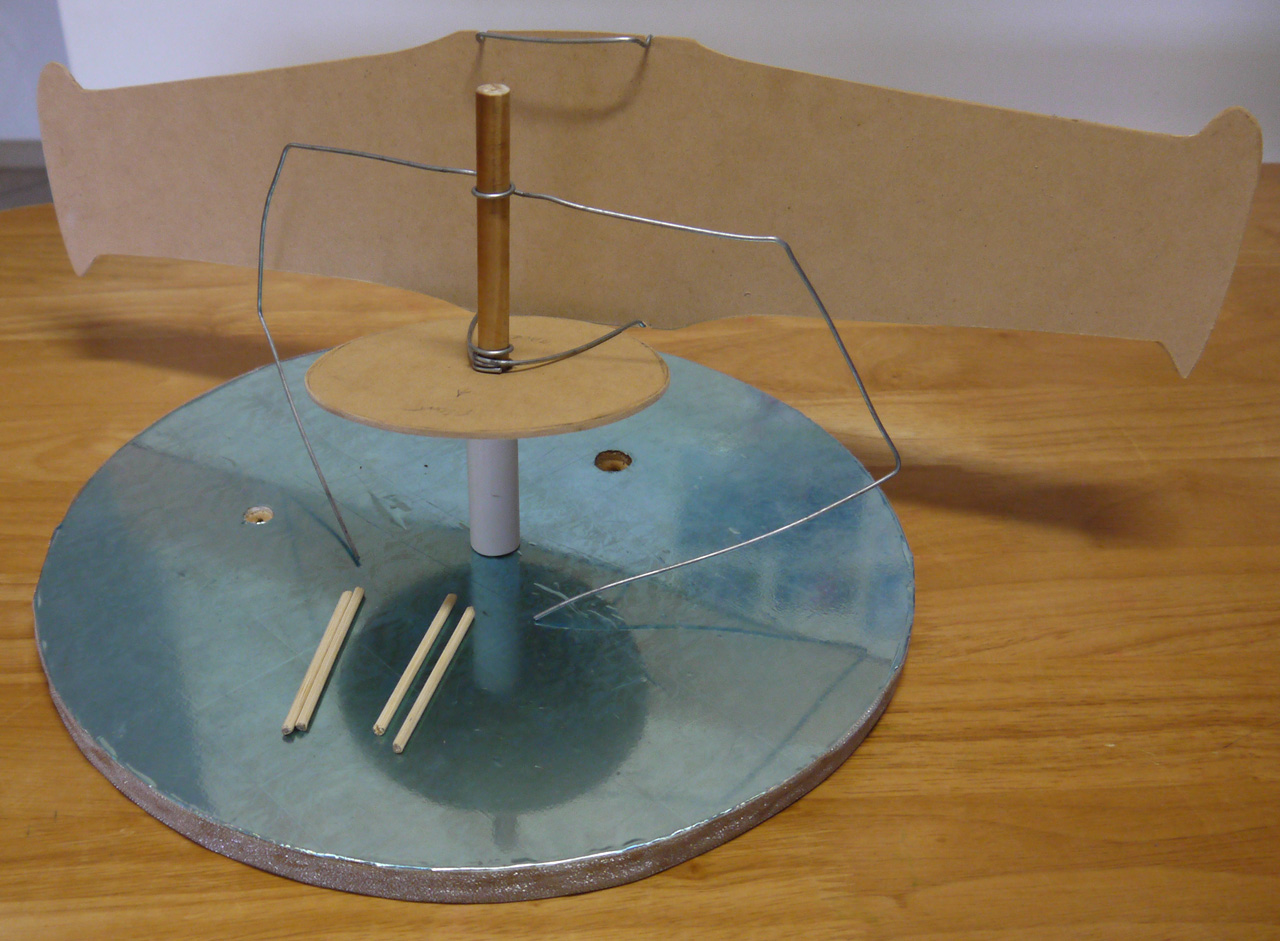 I struggled to decide how to attach the backpack and wings. I would have been even more concerned if I’d realised how heavy they would end up. What I ended up with did the job, but I wouldn’t do it that way again. I figured the backpack would be glued onto the wings using melted marshmallows. The wings were then designed to be held on by the weight of the cake. To allow the cakes to go onto the center dowel I left the top unattached, planning to tie it to the center dowel once the cakes were all on.
I figured I’d also glue the arms to the armature using melted marshmallows. The wire would go in between the second and third cakes. I tried to get the loop around the support tight enough that the arms wouldn’t swing, but that proved difficult. Had I looped it around a few more times it would have been much better.
Because Tuesday and Wednesday were supposed to be 38 degrees, I didn’t want to even start decorating until Thursday. I planned to make the fondant, rice crispies and cakes over the two hot days, then spend Thursday and Friday putting it all together. Saturday we’d be away, and then the party on Sunday.
Making the Cake
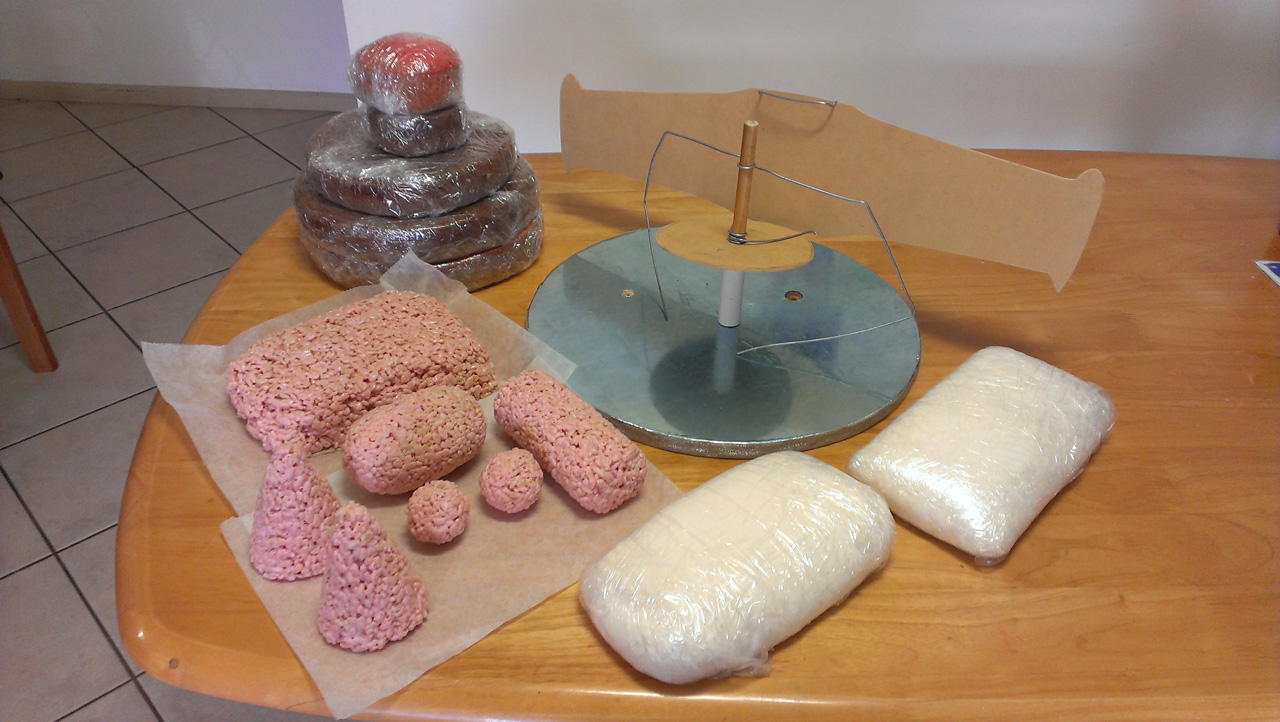 Making the fondant, rice crispies and cakes all went fine. I always have trouble estimating the amount of fondant I need. I usually end up with not enough, so I roll it thinner than it should be, or heaps left over. This time I guessed 3 batches which ended up being just the right amount, yay.
I’d figured out what shapes I needed for the rice crispies to make the backpack and arms. Leaving them to dry for a couple of days would make them solid enough to carve the rest of the details.
Thursday
Throughout the design process I never decided what to do about the lights in the wings. On Thursday as I was about to start putting it all together I remembered that I had a bunch of LED’s that I’d got a few years ago just in case I had an opportunity to include lights in a cake.
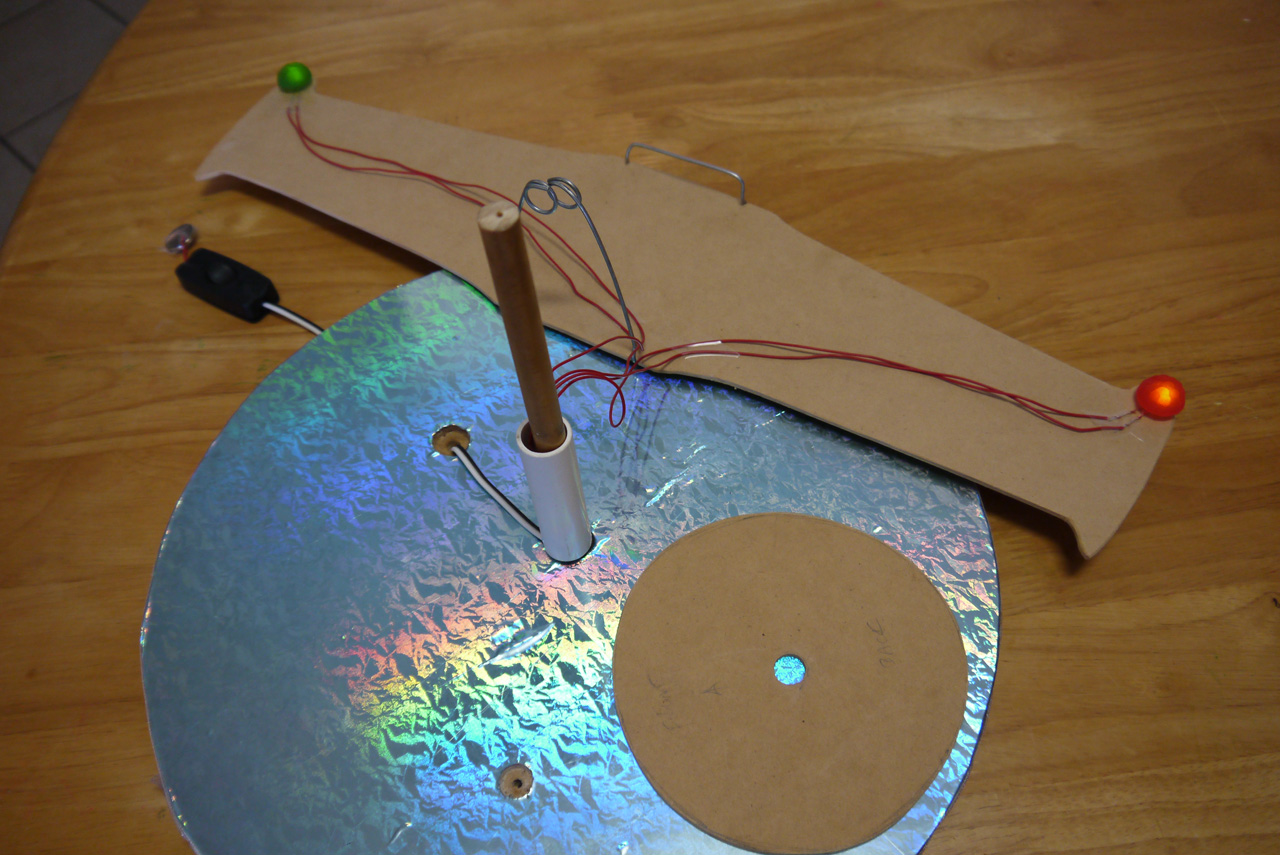
I experimented with what lollies to use. Red and green rasberries were a good size and let the light shine through. I just needed to push the LED’s into the back of them. A couple of hours later I had the lights working, and had figured out how to hide the wires. What I didn’t foresee was how much more difficult it would be having the wings attached to the stand…
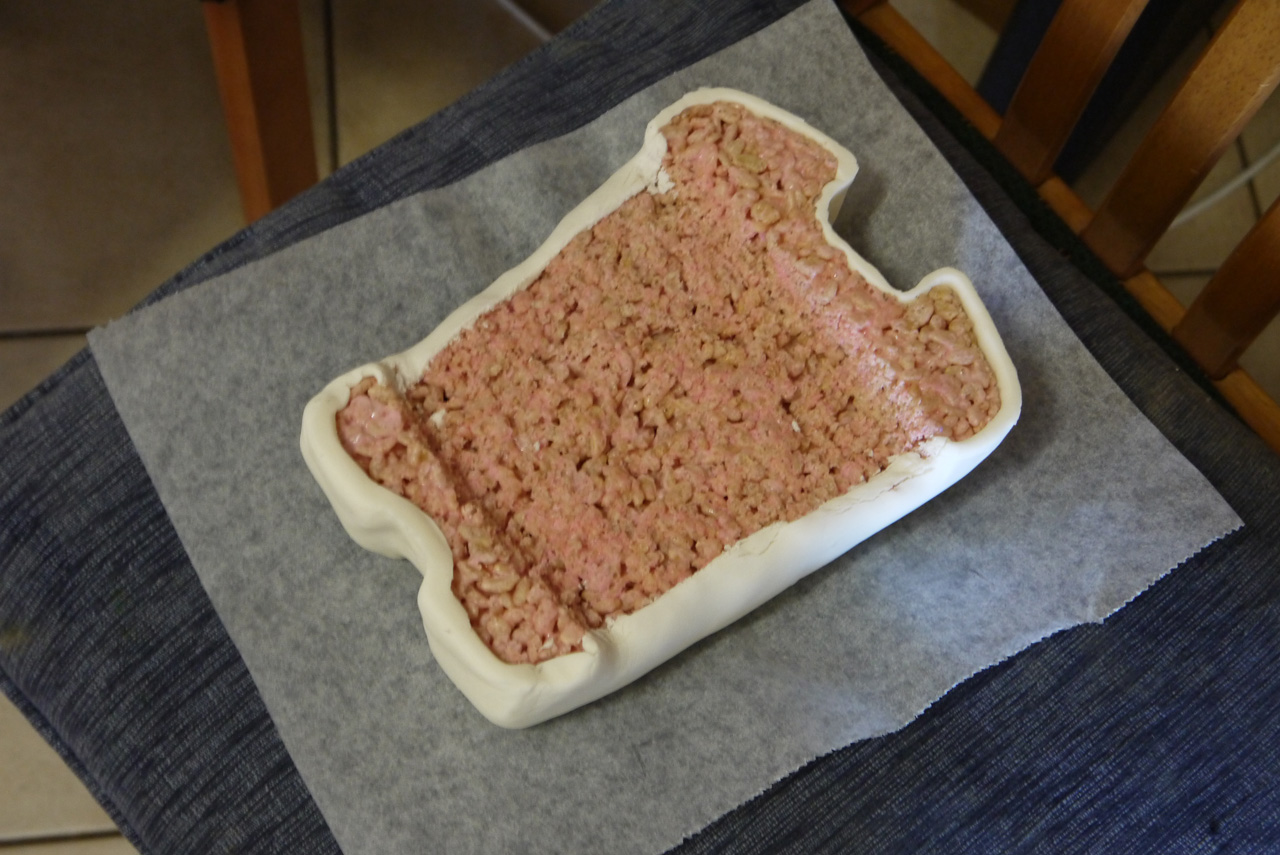
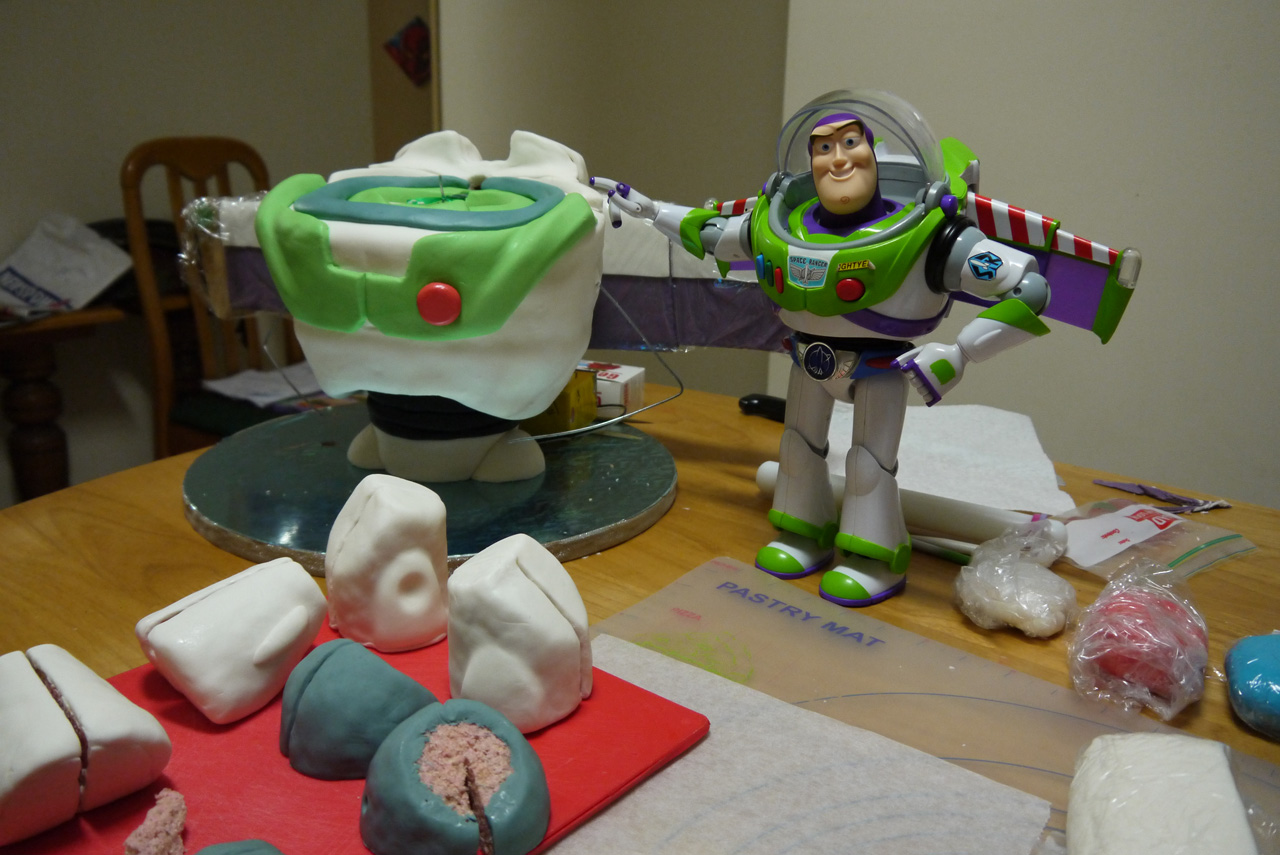
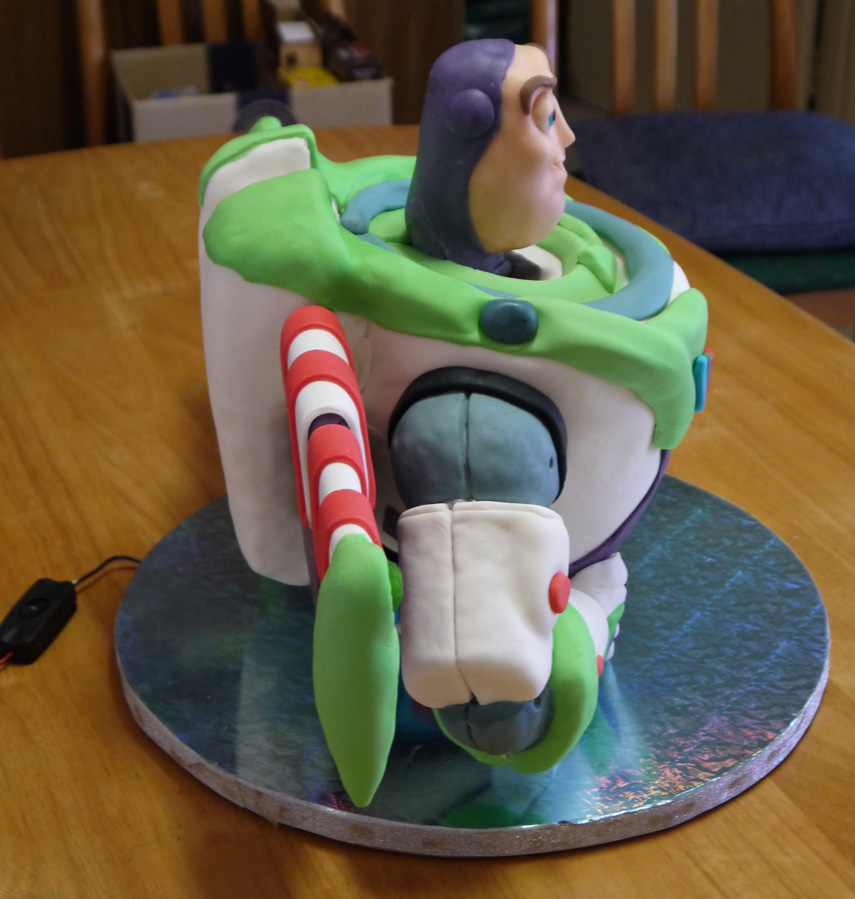
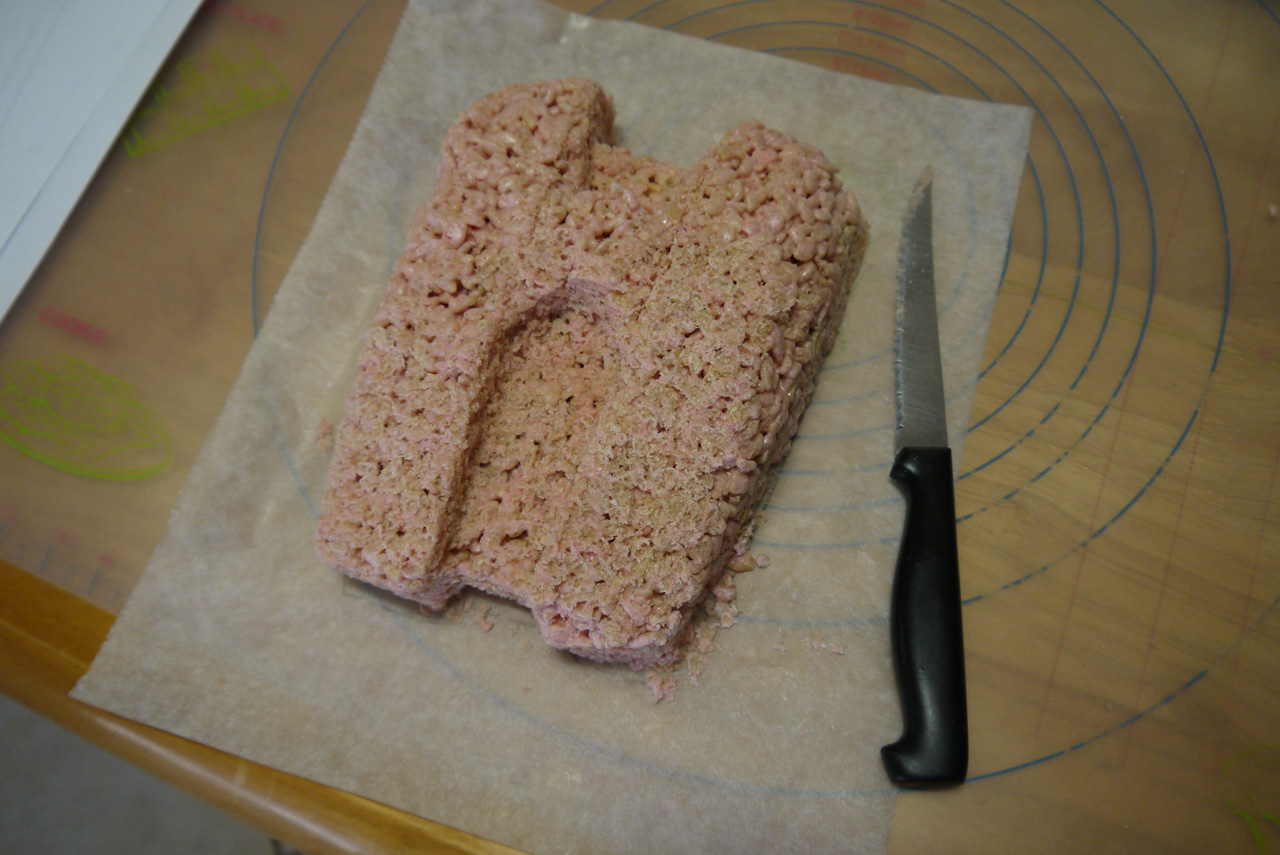 Then I carved the rice crispies into the right shapes, starting with the backpack. As I carved the gap for the wings, I tested it to make sure they fit together. I needed to be careful as the backpack became fairly weak with that much carved out of it, and started to break in half. Hopefully the fondant would strengthen it.
The arm pieces were easier. I had thought originally that I would cut each piece in half, and then glue them together around the wire. As I was carving I changed my mind and just cut them half way through, to where the wire would go. That way they’d have a bit more support.

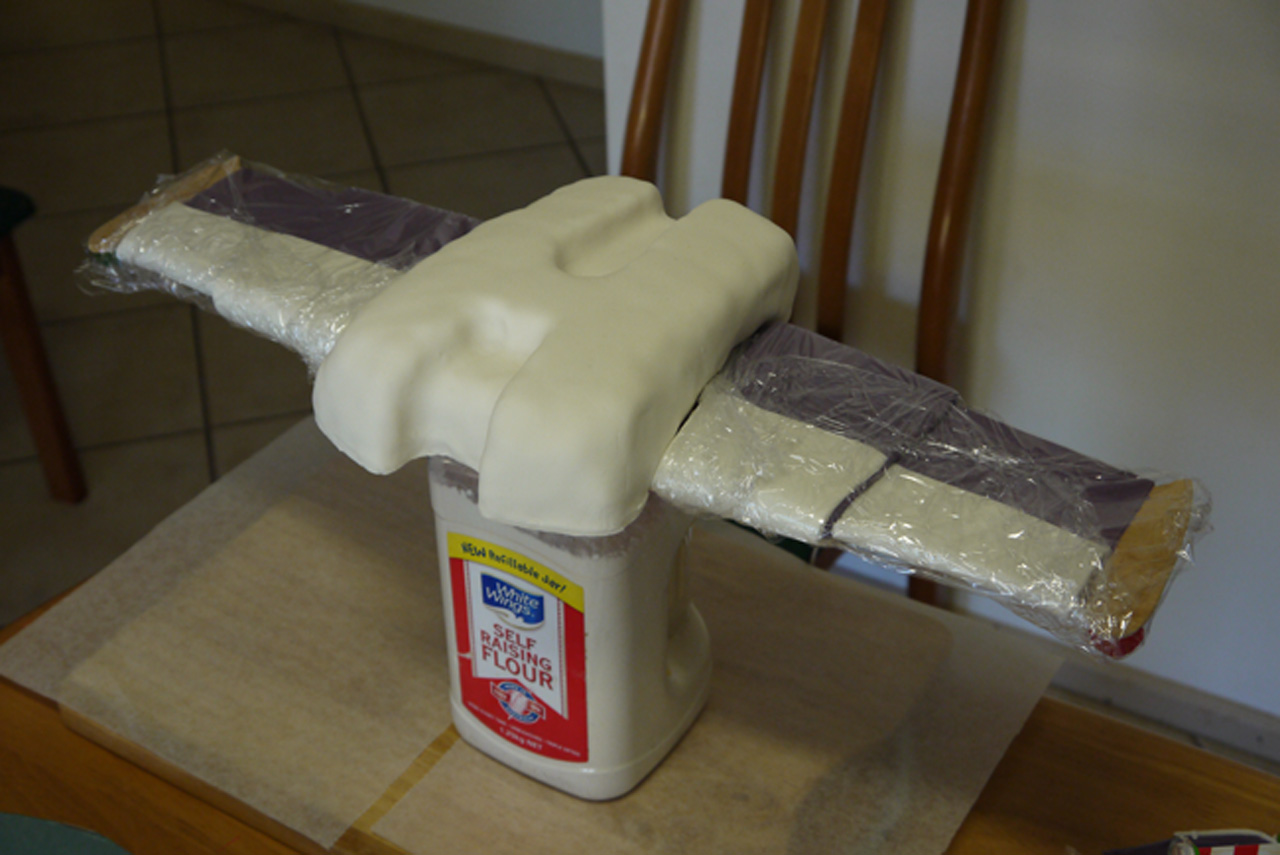
Next I got the wings covered with fondant, so that by the time I was putting them on the cake the fondant would be hard and could withstand some handling.
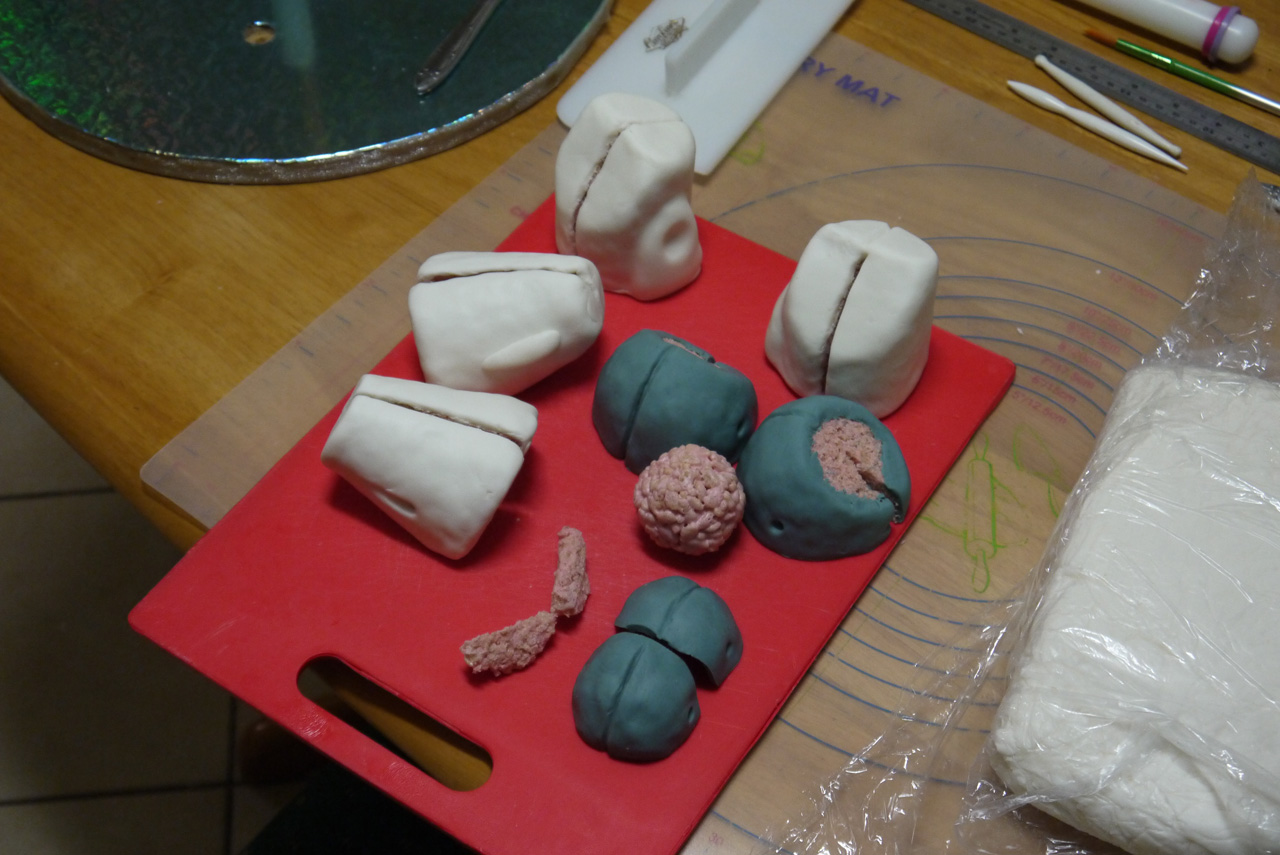 Then I covered all the rice crispies with the main layer of fondant. I wanted to do this early as well so that they could all withstand the handling they’d need to be put onto the armature. I left them all to set overnight.
I was stressing about how much I still had to do, when I realised that I didn’t have to get it finished by Friday night, as we weren’t leaving until 2pm on Saturday – I still had all of Saturday morning to decorate. So at 2am I decided to get some rest and make a fresh start in the morning.
Friday
 The next day, the backpack was set enough to put it onto the wings. I checked that they fit, and found that I needed to do a bit more carving since the fondant was getting in the way. I melted some marshmallows, spread them onto the wings and the backpack, and put them together. Never having used marshmallows as glue before I had no idea how long it would take to set. I figured rice crispies don’t take too long to hold together, so the marshmallow glue shouldn’t either. I put the wings aside as I started on the cakes.
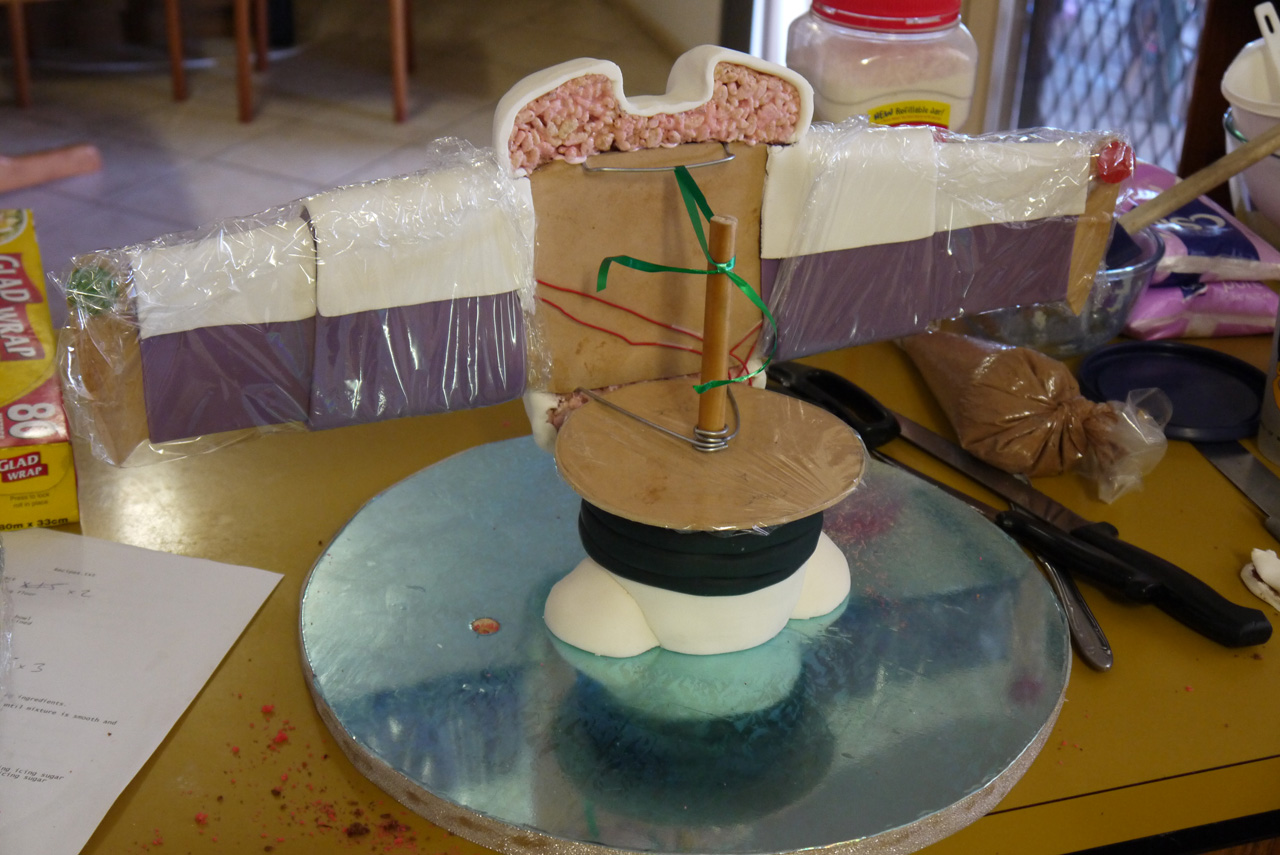
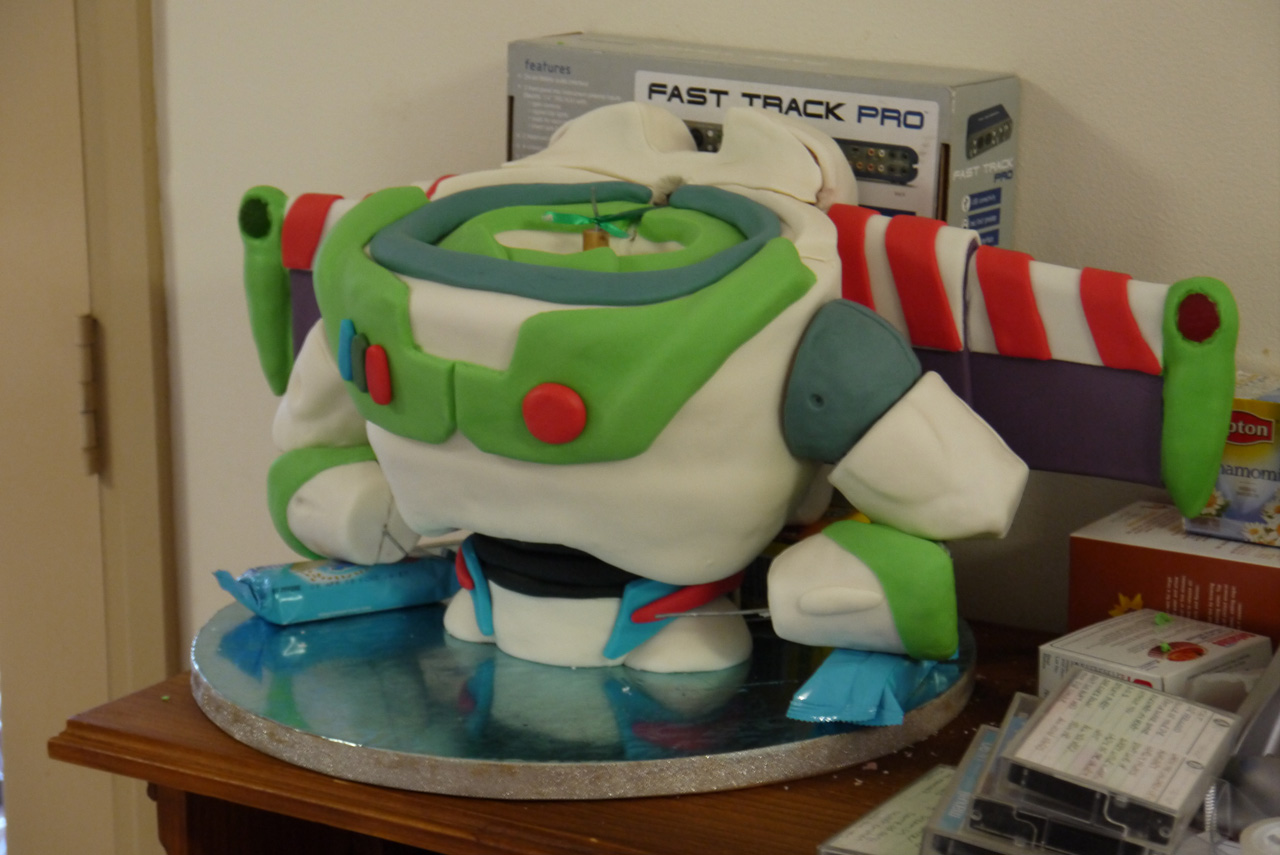
I had two small cakes as the torso. I put them in place, and covered them with fondant, making sure the wires for the lights went though first. It was annoying having to have the wings so close, but so far so good. I used some skewers to help support the weight of the chest, then I put the support board for the chest on top. I lifted the wings into place and realised they wouldn’t stay up without me holding them. Since I couldn’t find any string, I used some ribbon that I found in a draw, within arms reach, to tie the top to the support. It wasn’t as secure as I would have liked, but it was holding up.
 It was time to put the cakes on the chest and started carving. It was precarious, as I really needed both hands to put the cake on, plus an extra hand to hold the backpack, as I had to take off the ribbon to get the cakes on. I eventually got them all on and carved into the right shape before realising that I’d forgot to put the arm supports in between the second and third cakes…
Now I’d tried to remove a cake layer before, and it’s pretty tricky to do. The filling works very well as glue, and it’s really easy to break the cake. Trying to do it while holding up the backpack with one hand was a disaster waiting to happen. Luckily Marie was able to help, holding up the backpack while I got the top layer of cake off and put the arms in.
I had originally thought to have another wooden support disk to stop the arm wires cutting through the cake, but in all the excitement completely forgot to make it. I just used some cardboard under the wires instead, which was just enough to stop the wires sinking into the cake.
Just as I started to relax from that ordeal, the backpack fell off the back. Just fell right off. I quickly melted more marshmallows, twice as many as last time, and slathered it onto both sides and put it back. But how was I going to hold it there to dry? My mind in a panic, Marie suggested putting it up against a wall. I propped it up on a box, and up against the wall. Phew.
Lesson learned:
When using melted marshmallows as glue, use plenty and make sure it has at least overnight to set before trying to defy gravity.
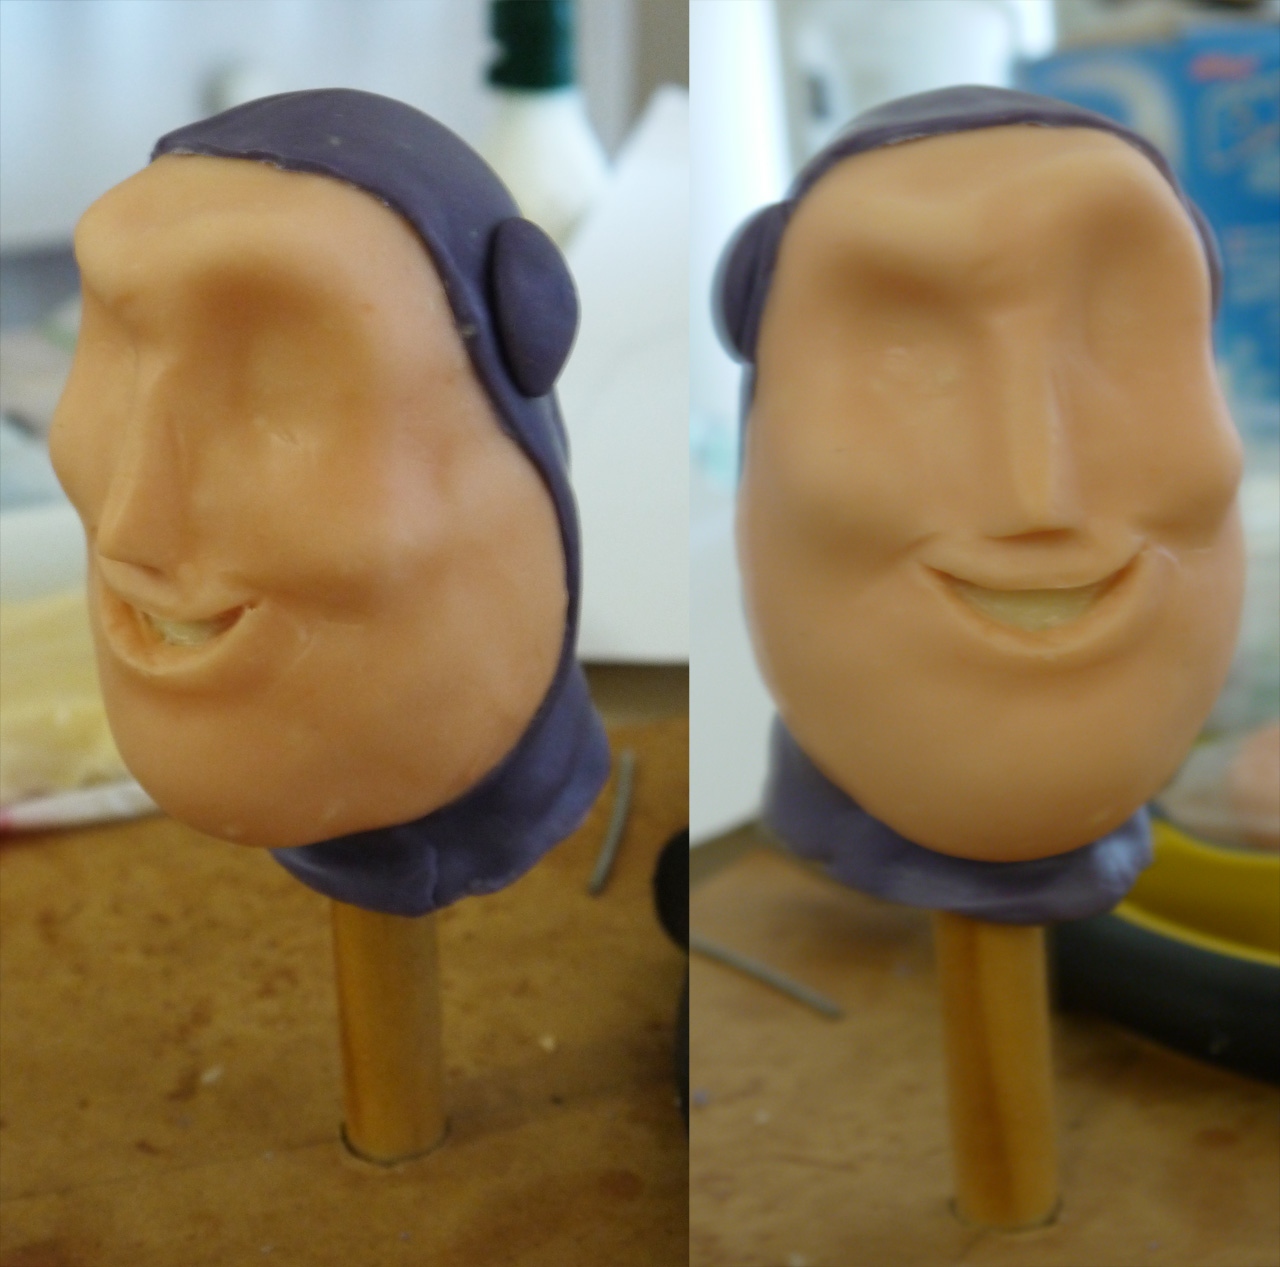
 While the backpack glue set, I started on the head. I’d already made a base of rice crispies, so I covered it with a base coat of plain white modeling chocolate to establish the basic shapes. I’d leave that to harden overnight before covering with a thin layer of the correct color modeling chocolate.
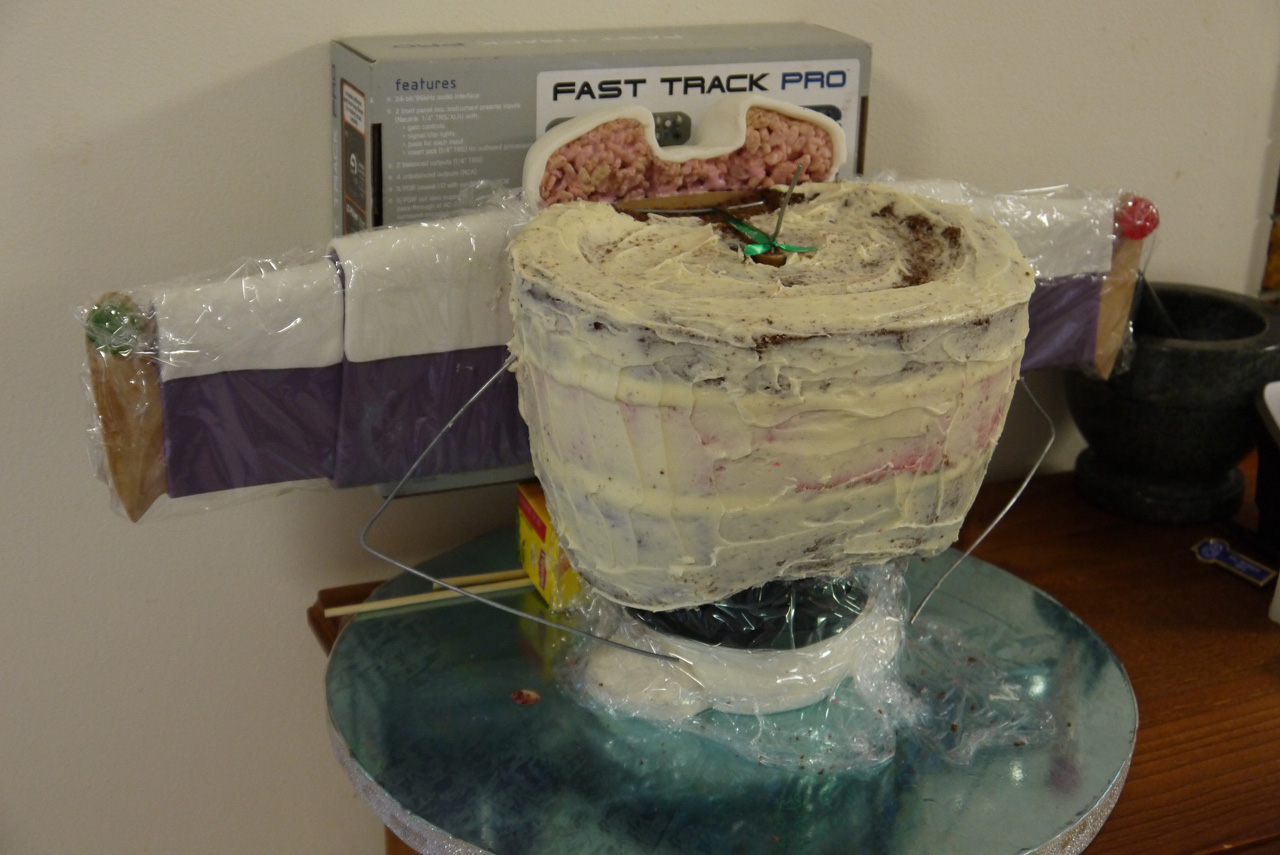
I was hoping by then the backpack would stay in place long enough for me to cover the chest with fondant. I covered the chest, got some details done, and called it a night. I just needed to finish the head and put it all together in the morning.
Saturday
 By the time I finished getting breakfast ready for myself and the kids it was 10am already – only four hours until we had to leave. I got cracking, adding details to the cake. With the belt made, and major details on the chest done, it was time to add the arms.
I put on the shoulders, using icing as glue. They held on quite well. Next I put on the upper arms. The extra weight pulled the wire down, pulling the shoulders away from the chest.
Aargh!
 I propped the arms up on boxes and continued, while I tried to think of a way to unobtrusively prop the arms up when it was all complete.
I got the main color layers onto the head. I made the eyes, and figured I’d let them set before putting them on the next morning.
With time running out I added the green ends of the wings. I had to leave the arms being held up by packets of LCM’s, vainly hoping that sitting together overnight would be enough to keep the arms up by themselves.
Sunday
We got home at 10am and the party started at 2pm. I told Marie on the way home that I’d need about an hour to complete the cake before helping to setup for the party. Between finishing the arms, making the hands, putting final details on the top where the backpack joins the chest, finishing the head, and painting the all important rocket button, I got done about 3 1/2 hours later. Just enough time to shower and get ready before the party start time. Luckily all the party guests came a bit late.
At the last minute, the arms still not behaving, I cut some small blocks of polystyrene to replace the LCM’s still propping the arms up.
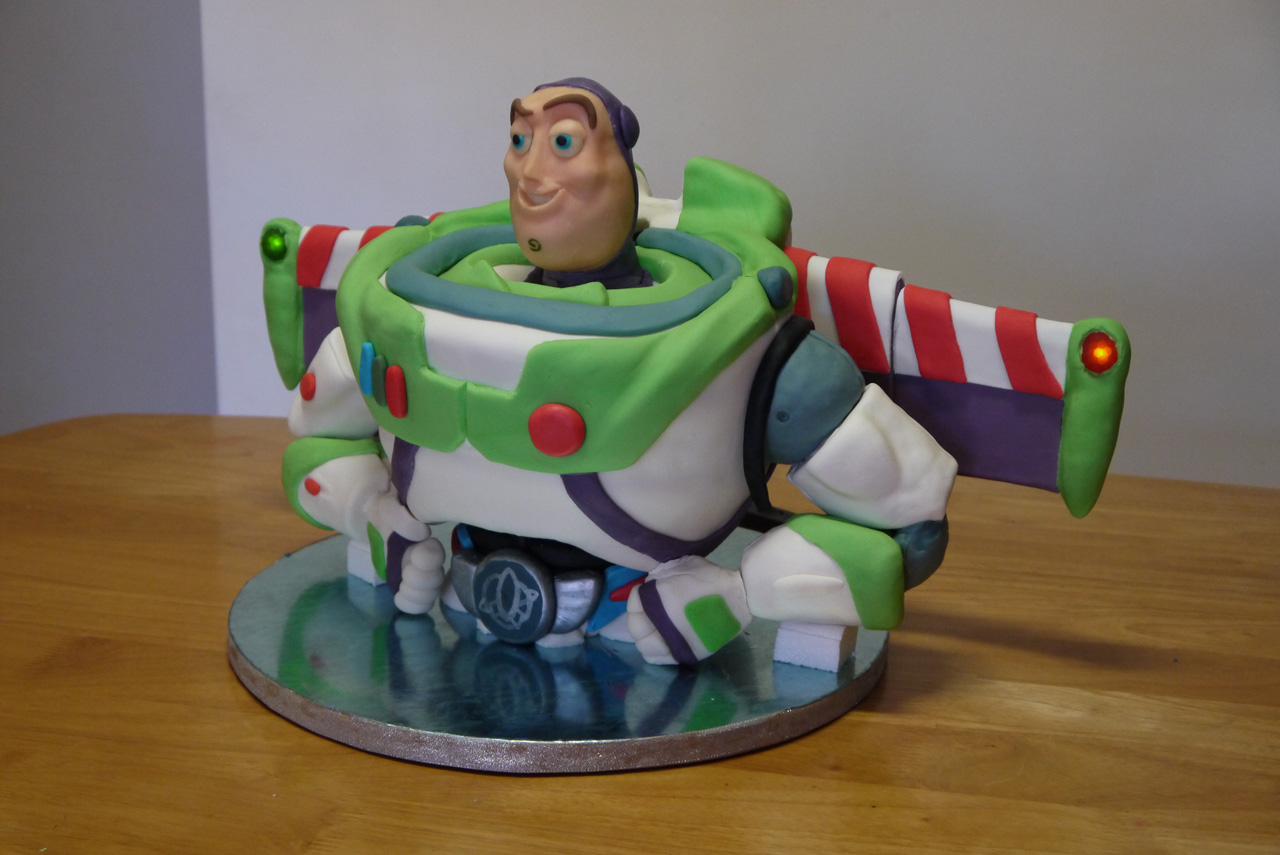
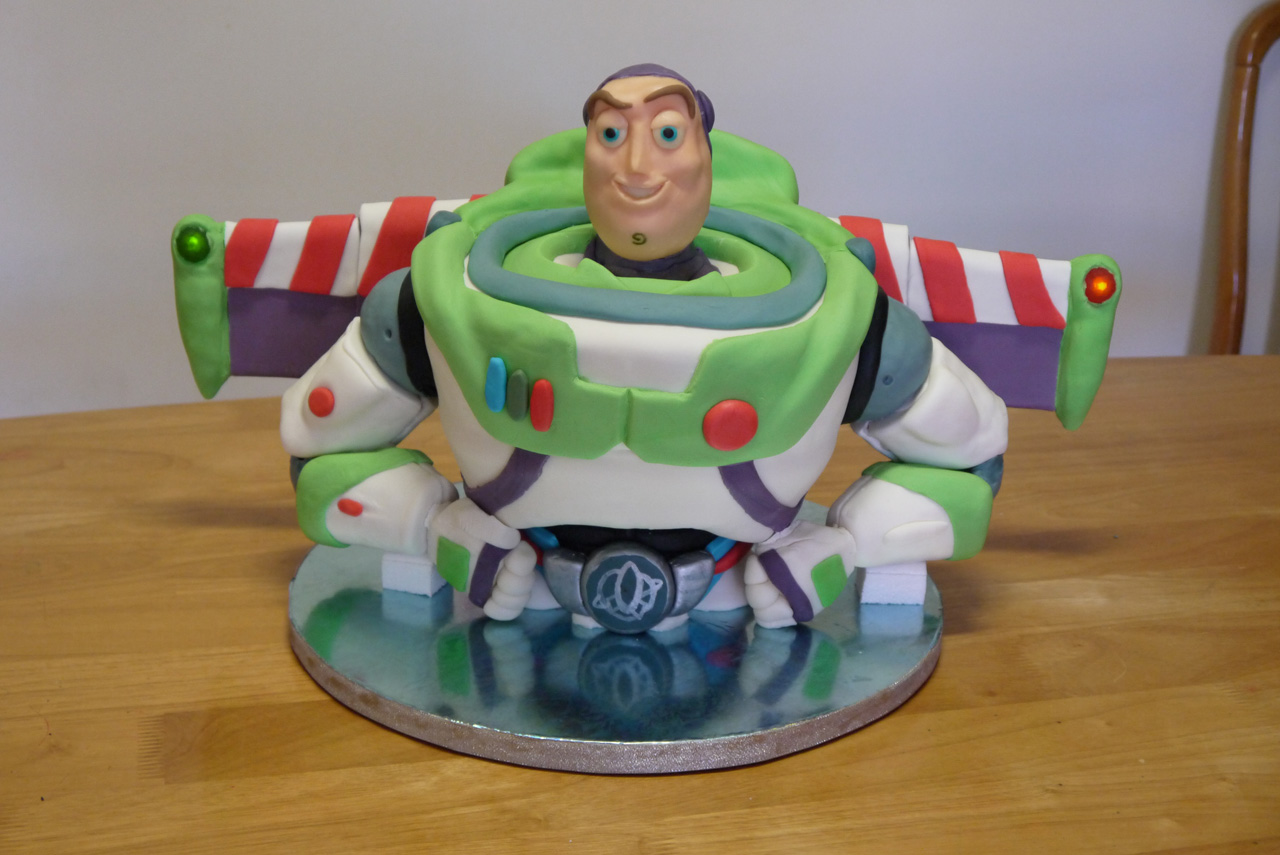
Unfortunately I ran out of time to finish the backpack, and add all the small details like the signs and stickers, but Seb didn’t care. He loved his Buzz Lightyear with a rocket button cake.
And the backpack stayed on.
If I had to do it again I would make the entire armature more secure. I’d perhaps make it modular so the wings and arms could be taken off, but at the very least give them stronger supports. I’d definitely make the disk under the chest more secure.
But I think the most important lesson I learned is that I really need to give myself at least one more day than I think I need…