I first wrote this article in 2001 as a partner to How to Determine an Hourly Rate. Since then it’s been published in books, magazines, and numerous times on the web. Since most of the sites it was published on have long since vanished I thought I’d post it here.
Download the Excel file used in this article.
Part 1 – Why Schedule?
One of the most important things about being in business is proper scheduling. Whether you’re working for yourself or part of a team, knowing how long things take, and when tasks will be complete are vital to a productive environment.
One question I hear asked quite often is how long a particlular task should take. The answer is quite simply just 5 minutes a day. The question can sometimes be valid if the task is something that the person hasn’t done before. The trouble is that everyone works at a different pace, and everyone has differing opinions about how long a task might take.
By following the tips in this article, in a very short time you will be able to estimate much more accurately how long a particular task will take you. This will benefit in quoting for jobs, organising your workflow, and enhance productivity.
Just 5 minutes a day is all it takes
Very few people take the time to schedule properly. It’s often seen as a waste of time, and therefore given a very low priority. I must have heard the excuse a thousand times “But I’ve got to get this finished, getting the work done is more important.” This attitude is most prevalent in people who feel uncomfortable, or unable to estimate task lengths. And instead of working on the problem they choose to ignore it.
Scheduling is often seen as a Management tool that’s of little use in the real workplace. This is often enhanced by difficult scheduling procedures that some managers put into place. I have seen some scheduling procedures that really do take more time than the work itself. This approach is both unproductive and unnecessary. Scheduling exists to make life easier, not more difficult.
Once you settle into the routine of regular monitoring of your progress it becomes easy. Literally 5 minutes is all it takes, whether you do it as you complete each task, or do it at the end of each day.
Benefits of scheduling
The benefits of proper scheduling are abundantly apparent once you start putting it into practice.
1. An accurate record of what you’ve done and how long it’s taken.
Have you over looked back over a period of time and wondered what you did? I know I have often looked back over the last week wondering why I didn’t accomplish more. With proper scheduling you can look back and see exactly what you did. More often than not this feeling is caused by an unexpected problem, or a problem that took longer to overcome than expected. The schedule can be very reassuring in times like this.
2. You’re better prepared for next time.
With a good schedule, when you need to do the same or a similar task to something you have already done, you can merely look over the schedule to see how long it took, what problems there were, and estimate more accurately how long it will take this time.
3. A record of personal progress.
If you have a number of tasks that are similar, more often than not each successive task will take a little less time than the last. You can look at your schedule with pride seeing how you’ve improved from task to task.
4. A solid foundation for quotes.
When you next quote for a job you can look over your schedules and, if you have done similar tasks before, see exactly how long they actually took, or if you haven’t done the task before you can see what patterns emerge from previous estimates of untried tasks. More often than not you will find that you tend to underestimate the length of time something will take.
Unfortunately our memories aren’t adequate when it comes to doing this. Over time it’s easy to forget the difficulties involved with a job. You might remember a previous job taking 3 weeks, but forget that the last week involved 16 hour days with a couple of all-nighters at the end. Next time you quote for a similar job you may under-estimate the hours involved and be caught in the same situation again. Conversely you might remember a task taking 3 days, but forget that 2 of those days were spent solving a problem that won’t be an issue next time now that you have a solution. Next time you quote a similar job you may over-estimate the hours involved.
With a schedule you no longer have to rely on memory, or loosely recorded times. You can break down a job into individual tasks, and accurately estimate times for each of those tasks. This will make your life and the clients or employers lives much easier.
One issue that often arises from clients is when certain tasks will be complete within a job. Clients are usually results based. If they don’t see something they assume nothing’s being done. Unfortunately the reality of production is that often there may not be something to show early in the process. Planning and pre-production rarely reflect the amount of time involved, or while you’re animating there may be elements of the scenes that are unfinished so you hold off on final rendering until later. With a history of scheduling you can accurately convey to the client at the start of the job how long various aspects will take and when they can expect to see certain results. You can explain if they want to see a particular result early in the process how it may adversely affect the total time for the job.
Part 2 – Scheduling example
I first found this scheduling technique on the web. A programmer had developed a quick and easy system for monitoring his own progress. Since programming is one of the more difficult areas to estimate I knew I was onto something good. I have since lost my records of who this person is, but I credit him with the fundamental principle of this method.
Disillusioned with complex scheduling packages such as Microsoft Project, I put this new found method into practice straight away, initially expanding on the example I had to make it a little more useful in a production environment. Since then having scheduled and quoted many projects, both solo and team projects, I have enhanced the schedule far beyond its initial form. The schedule uses Microsoft Excel and, I must stress, is not meant as a replacement for MS Project or other project management tools. It is meant to accompany those tools when dealing with a large project.
Download the Excel file used in these examples.
Preparation
The basics of the schedule involve breaking down a project into major features. For example if the job is to create a 3D character you might break it down into:
- Modeling
- Morphs
- Texturing
- Rigging
- Tweaking
Then break down each feature into specific tasks. For example:
- Modeling
- Head
- Body
- Extremities (hands and feet)
- Clothes
- Mouth expressions
- Eye/eyebrow expressions
- Lipsync targets
- Head
- Body
- Extremities (hands and feet)
- Clothes
- Weight maps
- Bones
- IK
- Muscles and joints
- Model
- Morphs
- Textures
- Rigging
- Morphs
- Texturing
- Rigging
- Tweaking
The idea is to break down to the point that each task is estimated to take less than 8 hours, if possible. It’s very important to take your time during this step. I have witnessed people use this schedule without breaking down the job properly, either into features or tasks, and as a result receive much fewer benefits.
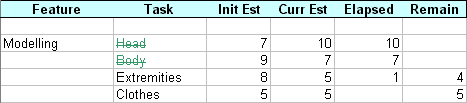
The next step is to estimate as accurately as you can how long each of these tasks will take, and place these estimates into the Initial Estimate column. Now copy these values into the adjacent Current Estimate column. As you can see the time remaining column is filled out for you. This will also give you an estimated finish date.
You can also fill out priority orders for the tasks in the Priority column. You can use as many priority levels as you wish, but I usually find 3 is sufficient.
Maintaining the schedule
Now that your schedule is ready to be put to use we come to what is probably the most important step, maintenance. As you work on each task, fill in the Time Elapsed column. You can also update the Current Estimate column as soon as you have a better idea of how long it’s taking. When you have completed a task, change the Current Estimate column to reflect the amount of time it actually took.
Now you have a record of how long you estimated a task to take versus how long the task actually took. This will be useful in the future.
I have also provided a couple of visual clues as to the status of a task. As a task is completed it will automatically get crossed out. Also tasks given priorities of 1 and 2 are highlighted for easy recognition. You can see towards the bottom of the worksheet as you complete tasks how many hours you have spent on the project, and an estimate of how many hours are left. This is very valuable when discussing your progress with the client.
Quite often as you get into the project you will find it useful to change some of the breakdowns. You may see a need to breakdown a task even further, or add to features or tasks that you had not anticipated initially. The beauty of this system is that you can do this quite easily, just by adding to the bottom line. All of the pertinent values will be immediately updated, reflecting your change.
Project Management
This schedule is very useful when dealing with other aspects of managing a project such as working to a deadline, and optimizing productivity. When you fill in the starting date for the project in the header, you will see a number of other values are calculated:
Estimated finish date is based on your current estimate of task times and your expected hours per day. This is a good indication of how long the project should take.
Projected finish date indicates how long the project is likely to take, based on your current task estimates and your average hours per day instead of your expected hours per day.
Average hours per day is the average of how many hours you’ve actually worked on the tasks listed. Sometimes you may work on multiple projects at once. You will probably want to reflect this in the Expected hours per day or Expected days per week in the header for each project if you have a separate schedule for each of the projects.
If you know at the beginning of a project when it will start and when it must be finished, make sure you fill in those values. Then when you’re creating your initial estimates for the tasks you can see immediately if you’re likely to fall within the deadline, or blow it out. As you progress you can keep an eye on the finish dates to see how you’re going.
If you can see that you’re blowing out the timelines during the project a number of solutions present themselves. You can work more hours in the day to make up for lost time, or decrease the time you allow yourself for later tasks. You can ask the client if it’s possible to push back the deadline, or ask if there are features that are less important to the project that you can then allocate less time to.
The important thing is that you are able to detect the problem early in the process, making it much easier to work out, rather than realising the day before the project is due that you’re not going to make it, putting you and your client in a difficult position.
Part 3 – Conclusion
The more you use a schedule, the better you will become at estimating how long things will take you. To begin with your initial estimates and actual times may vary considerably, they usually do. But as you do more projects and refer to past schedules you will soon find that your initial estimates become closer and closer to the actual time taken.
You can also use the principles of this schedule to take the idea much further. If you have read my earlier article on setting an hourly rate you will be able to quote for a project more easily knowing how long you expect the project to take, and what your hourly rate is. Just multiply the number of hours by your hourly rate and you have the total amount the project is worth. I have also expanded on it to schedule team projects, with each different element of the project scheduled together.
Before you know it you will wonder how you ever did without scheduling. You will feel more organised and better prepared to handle mishaps. When unexpected problems arise you will be able to deal with them calmly and with detailed knowledge of how they affect the big picture. You will have a record of your progress and how you’ve improved your production speed. But more than anything else you will feel confident quoting times for jobs knowing that your quote is based on actual experience, not just a guesstimate.
Remember, spending just 5 minutes a day on your schedule will end up saving you days, even weeks, in the long run.