 I wrote a couple of books a few years ago: Cartoon Character Creation – Volumes 1 & 2.
I always planned to post some excerpts here, but never got around to it. Last year, working on Chuggington with the fantastic animators at Motion Magic in China, I realized that while I have changed some of the ways I work since writing the books, the core information and methodologies remain the same, and is still very useful information that many animators aren’t aware of.
Since Chuggington is animated using Maya, and those animators were benefiting from this knowledge, it further impressed upon me how universal the information is. I was always disappointed that the books were tied to LightWave 3D 8 since so much of the information applied to 3D characters and animation in general, regardless of which software was being used. I guess this is also my chance to share that information with a wider audience.
I’m going to jump straight to one of my favorite sections of the books, and one of the most valuable ones, Morphs for Facial Animation.
Note: In LightWave, morph targets are called ‘Endomorphs’, in Maya they’re called ‘Blend Shapes’ and in Blender they’re known as ‘Shape keys’. For simplicity here I’ll just refer to them as ‘Morphs’.
Morphs for Facial Animation
Morphs are the ideal way to create facial expressions for cartoon characters. While using morphs is not the only way to create facial animation, it is the easiest method for both creating and animating facial expressions. You have more flexibility using morphs than other techniques, such as using bones, as you have full control over the position of every point in the model for each morph.
LightWave’s implementation of morphs, called endomorphs, is useful in that it records new point positions for each point included in the morph in a vertex map. This means that all your morphs are held within the model itself instead of having a different model file for each morph as with Maya. Other benefits of endomorphs are that you can adjust point positions in the base model at any time and have those changes automatically propagate through the morphs. You can add or remove geometry and the morphs update appropriately, and you can create multiple characters from a single base character without having to create new morphs for each one, as they just inherit the morphs from the base character (although they will likely need some adjustments).
The drawback to morphs is that they are linear. This means that the points move from A to B in a straight line. While it’s rarely noticeable when the morphs are mixed together and moving fluidly, it can be noticed in certain situations. The eyelids are one of the most common areas you might notice this, which is why for some characters it’s useful to use bones instead of morphs, or a combination of the two, for some things (later in the book I explain some ways to overcome the linear aspect of morphs when it becomes a problem).
The most important resource for creating facial expressions is a mirror. Make sure you have one next to you at all times when creating the morphs. When you start to create a new morph, make the same expression while looking in the mirror to see what your face looks like and how it changes when you move back and forth from a neutral expression to the required expression. By doing this you have a much better idea of what you need to change in your model to create the same expression. Make sure you check your own face fairly regularly during the creation of the morph to make sure you haven’t forgotten anything.
Planning
For every character you need to determine what morphs it needs. While the basic morph list shown later in this section is a great starting point, different characters often have different needs. Some characters may not need all the morphs in the basic list, while others may need more specialized morphs. Choosing the right morphs for your character depends on having a solid understanding of how morphs are used.
Modular Morphs
Morphs are most effective when they’re modular. The benefit of modular morphs is that you only need a few morphs to create hundreds of different expressions by mixing them in different ways and in different amounts, and the facial animation of your character will be more fluid the fewer morphs you have. By using modular morphs to their full potential you save yourself a lot of time
both in creation and animation, as well as allow more flexibility and variety in your facial animation.
Often this method is described as separating each muscle of the face into its own morph, so when they’re mixed they work just like our own faces do by mixing the movement of different muscles to create different expressions. While the method I use is loosely based on this idea, it’s been customized for ease of use, combining the motion of some muscles into commonly used expressions such as a smile, which in reality is the combination of multiple muscles.
What is most important when creating modular morphs is to ensure that morphs can be mixed and still work properly. Morphs build on each other, so if a point moves the same amount for two different morphs, when both morphs are at full strength the point moves twice as far as each morph individually. This means you have to be careful when creating the morphs that you don’t move points that may adversely affect other morphs. For example, if you include the eyelids in a frown morph, you might have to reduce the frown when the character blinks, as otherwise the eyelids will not meet properly for the blink. By excluding the edges of the eyelids from the frown morph, the character can blink while frowning, which is far more desirable.
A mistake I see often is morphs that are too specific, like emotion morphs such as a Happy morph that encompasses the entire face. Morphs like these limit your flexibility and require more work when animating. You need to think about how each morph affects the other morphs it may be mixed with. Each morph builds on the other active morphs when mixed, so if the Happy morph includes the eyelids 50% shut, and the Blink morph includes the eyelids 100% shut, then a combination of the two morphs would move the eyelids 150% shut, far beyond closed. You could include a separate Blink morph to be used with the Happy morph, but then you’d also need a separate version of all the other morphs to be used with the Happy morph, and you’d quickly end up with hundreds of morphs, which would require significant effort to create and would be equally challenging to animate. Thus, the modular morph solution is to create the basic elements of each emotion in separate morphs so they can be mixed together to create the emotion expressions.
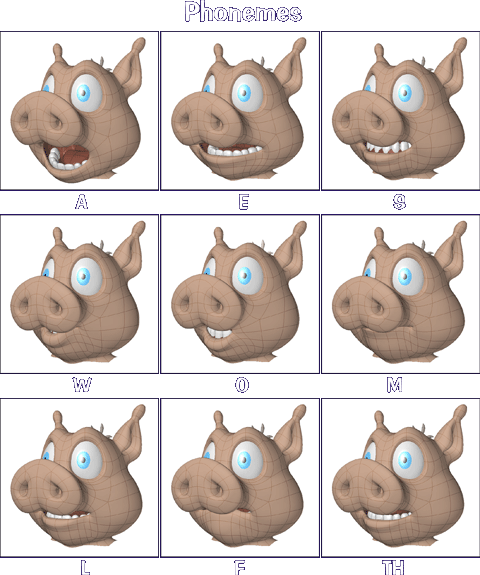
The modular principle applies to all the morphs, including expression morphs and phoneme morphs. If you decide to create phoneme morphs as well, you can mix them with expression morphs to adjust the character’s emotion while it is talking. You can also mix phonemes to create more mouth shapes, reducing the number of specific phoneme morphs needed.
What Morphs Do You Need?
When starting a production it’s a good idea to sit down with the director and animators and decide on a list of morphs common to every character. While certain characters may require unique morphs, having a common morph list helps continuity and makes the animator’s job much easier.
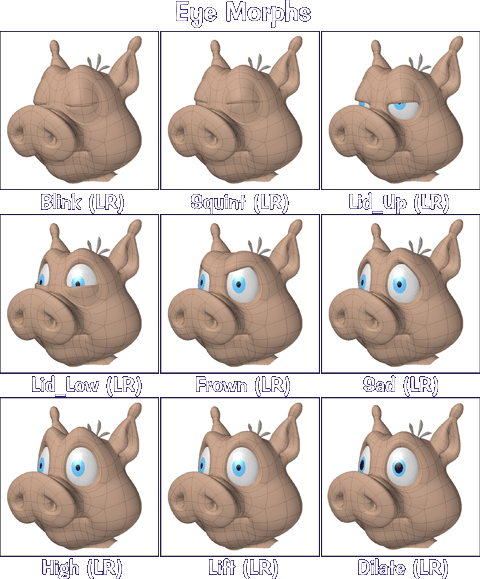
Over time I’ve developed a basic morph list that I use as a starting point for all my characters. These morphs provide for all of the basic emotions and mouth shapes necessary to create convincing facial animation. Feel free to add a few more morphs to the list for your own production to add nuance or variety, but before you do, try to create the required expression using these morphs first, only adding a new morph if the expression is not possible using the basic morphs.
The basic morph list is shown here using Hamish as the example. When we look at the morphs in more detail (in part 2), each one is shown with multiple character examples.
|
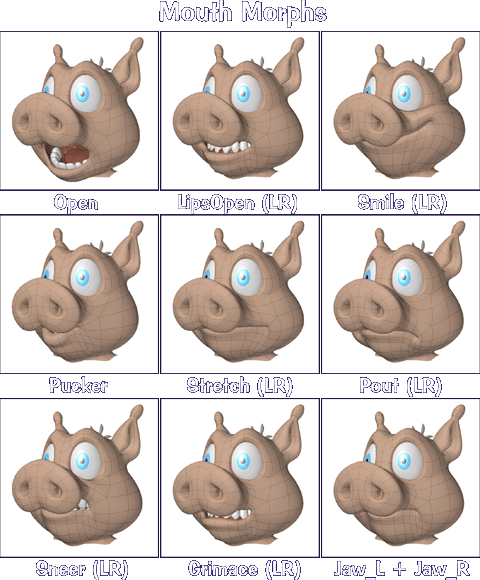
While it’s not always necessary for simple animation, the morphs listed with (LR) next to them can have the left and right sides separated into additional morphs for greater variety of expression. By including the left and right separations you can achieve asymmetrical facial animation, giving much more personality and liveliness to your characters.
Next time we’ll take a look at each one of these morphs in more detail, the theories behind them, and how to create them. In the mean time if you’ve found this useful, or disagree with a point, or have any questions please don’t hesitate to leave a comment.