
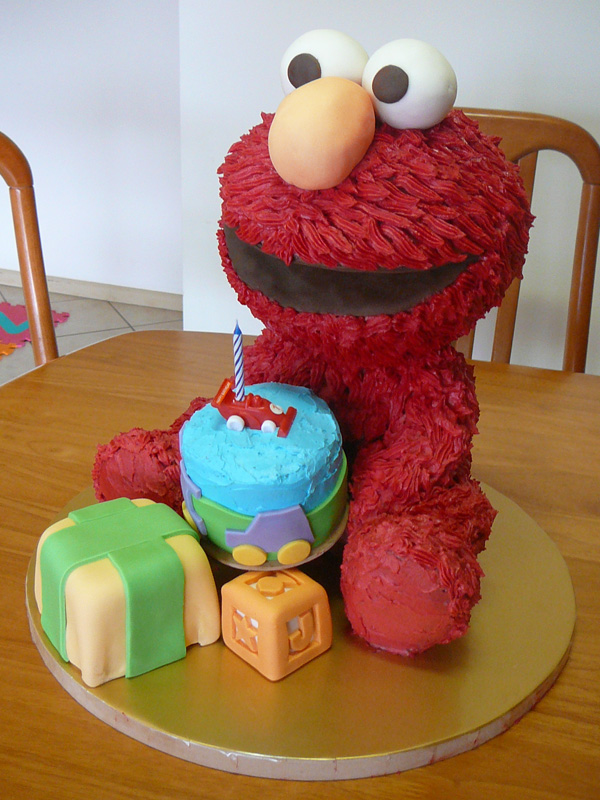
 I’ve had some people ask me for instructions on how I made my Elmo cake, or for more information on the details. Unfortunately due to the disorganized way it was created I forgot to take photos along the way as I have for some of the other cakes, so in lieu of showing progress pics I thought I’d write a bit about how I made it and share the plans I created.
The first step is to plan the cake and make the stand. The size of the cake depends somewhat on the number of people it needs to serve. My Elmo cake needed to serve at least 40 people, so it’s larger than you would need if you were only serving 20 people. I also like to err on the larger side, as I like decent sized servings rather than the smaller wedding cake sized serves which are often used as guides for these kinds of cakes, and it’s always better to have a bit too much than not have enough. With sculpted cakes it’s also important to keep in mind that sometimes as much as half the amount of cake that you start with gets cut away, and so your plans need to allow for that.
As well as the main cake, I’d originally planned to have more cupcake sized blocks and toys around the cake that could have been given to the kids at the party which boosts the serving numbers too.
Also when planning, the size and type of your cake pans come into play. My original idea was to use a pudding tin and a small Pyrex bowl for Elmo’s body. Everything else was planned around that size and I think ended up a bit bigger than I needed. I could have adjusted the plans to use different pans, or cut more cake away, but I didn’t mind making it bigger than it needed to be for the sake of ease. I prefer to let the cake tins dictate as much as possible, leaving less cutting and sculpting, and less margin for error.
Making The Stand
Once I’d determined the size and basic shape of the cake it was time to design the stand. This cake had originally been intended for a party 2 hours drive away. The head makes it quite top heavy so the stand needed to be designed well to make sure the cake didn’t fall over. The other consideration for the stand was that I wanted the smash cake to be removable so it could be lifted off and given to the birthday boy, but it needed to be sturdy enough not to move until then.
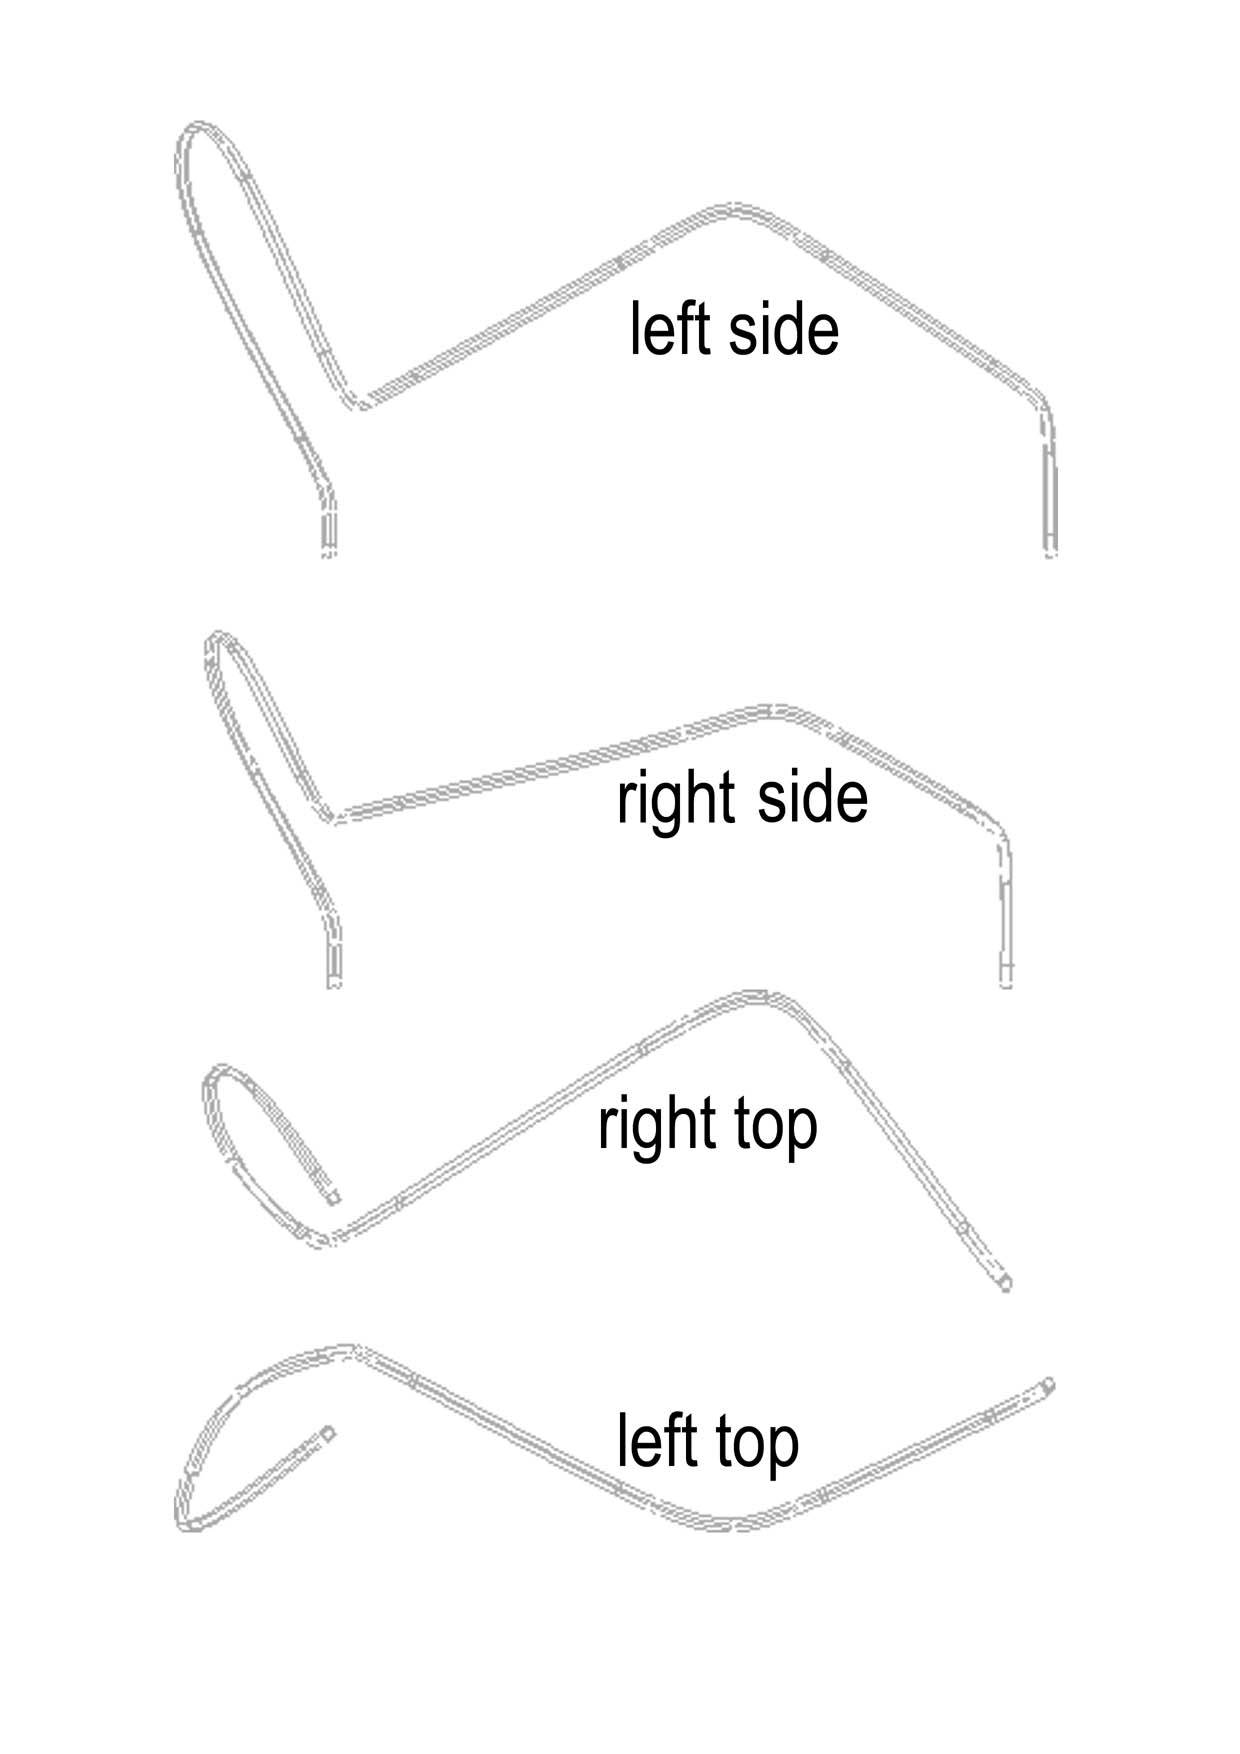
I had decided to use rice crispies for the arms and legs, with coat hanger wire support for the legs. I figured the icing should be able to hold the arms in place without needing extra support. Now I’ve made the legs a bit fancy, with his knees bent and having each leg at a slightly different angle. You can make it easier for yourself by having his legs straight on the board which means you wouldn’t need the wire supports.
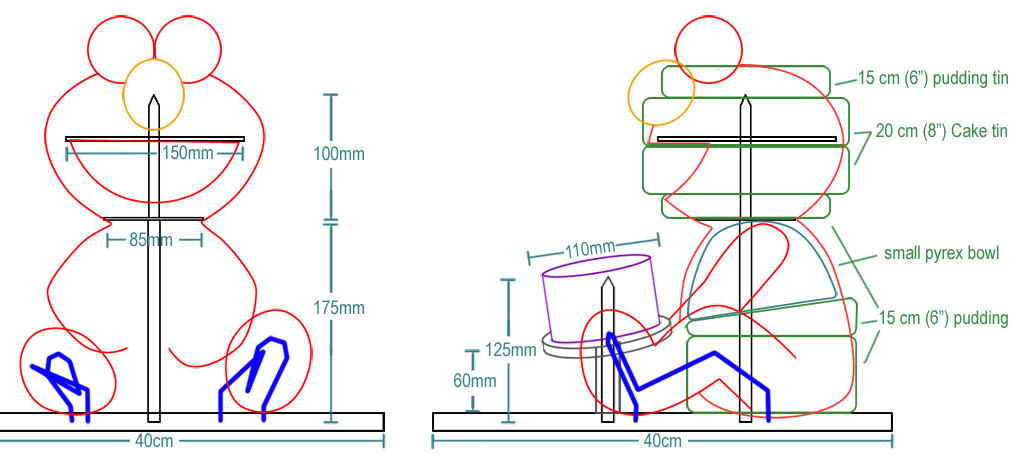 The resulting stand consists of the base which is 40cm in diameter, a dowel up the center of Elmo’s body and head and a dowel to hold up the smash cake. The dowel up the center is made up of a 12mm width dowel up to the neck, then a disk to hold the weight of the head with a 9mm width dowel up through the head. The two dowels are held together by drilling a hole in the end of each and attaching them with a short piece of coat hanger wire. This makes a very strong joint that won’t break, but that can be easily pulled apart when cutting the cake or dismantling the stand. There is a 30cm piece of coat hanger wire for each leg, bent into shape and then placed into holes drilled into the cake board.
Now we get into the manly part of making cakes, the cake stand. We need a range of power tools for this job, including a jigsaw, a drill, a sander, a small saw for cutting the dowel and PVC pipe, pliers for bending the wire, and pliers or wire cutters for cutting the wire.
 The materials I used were:
- 16mm MDF for the cake board
- 3mm MDF for the support disks
- 12mm dowel
- 9mm dowel
- 12mm PVC pipe
- 2 wire coat hangers
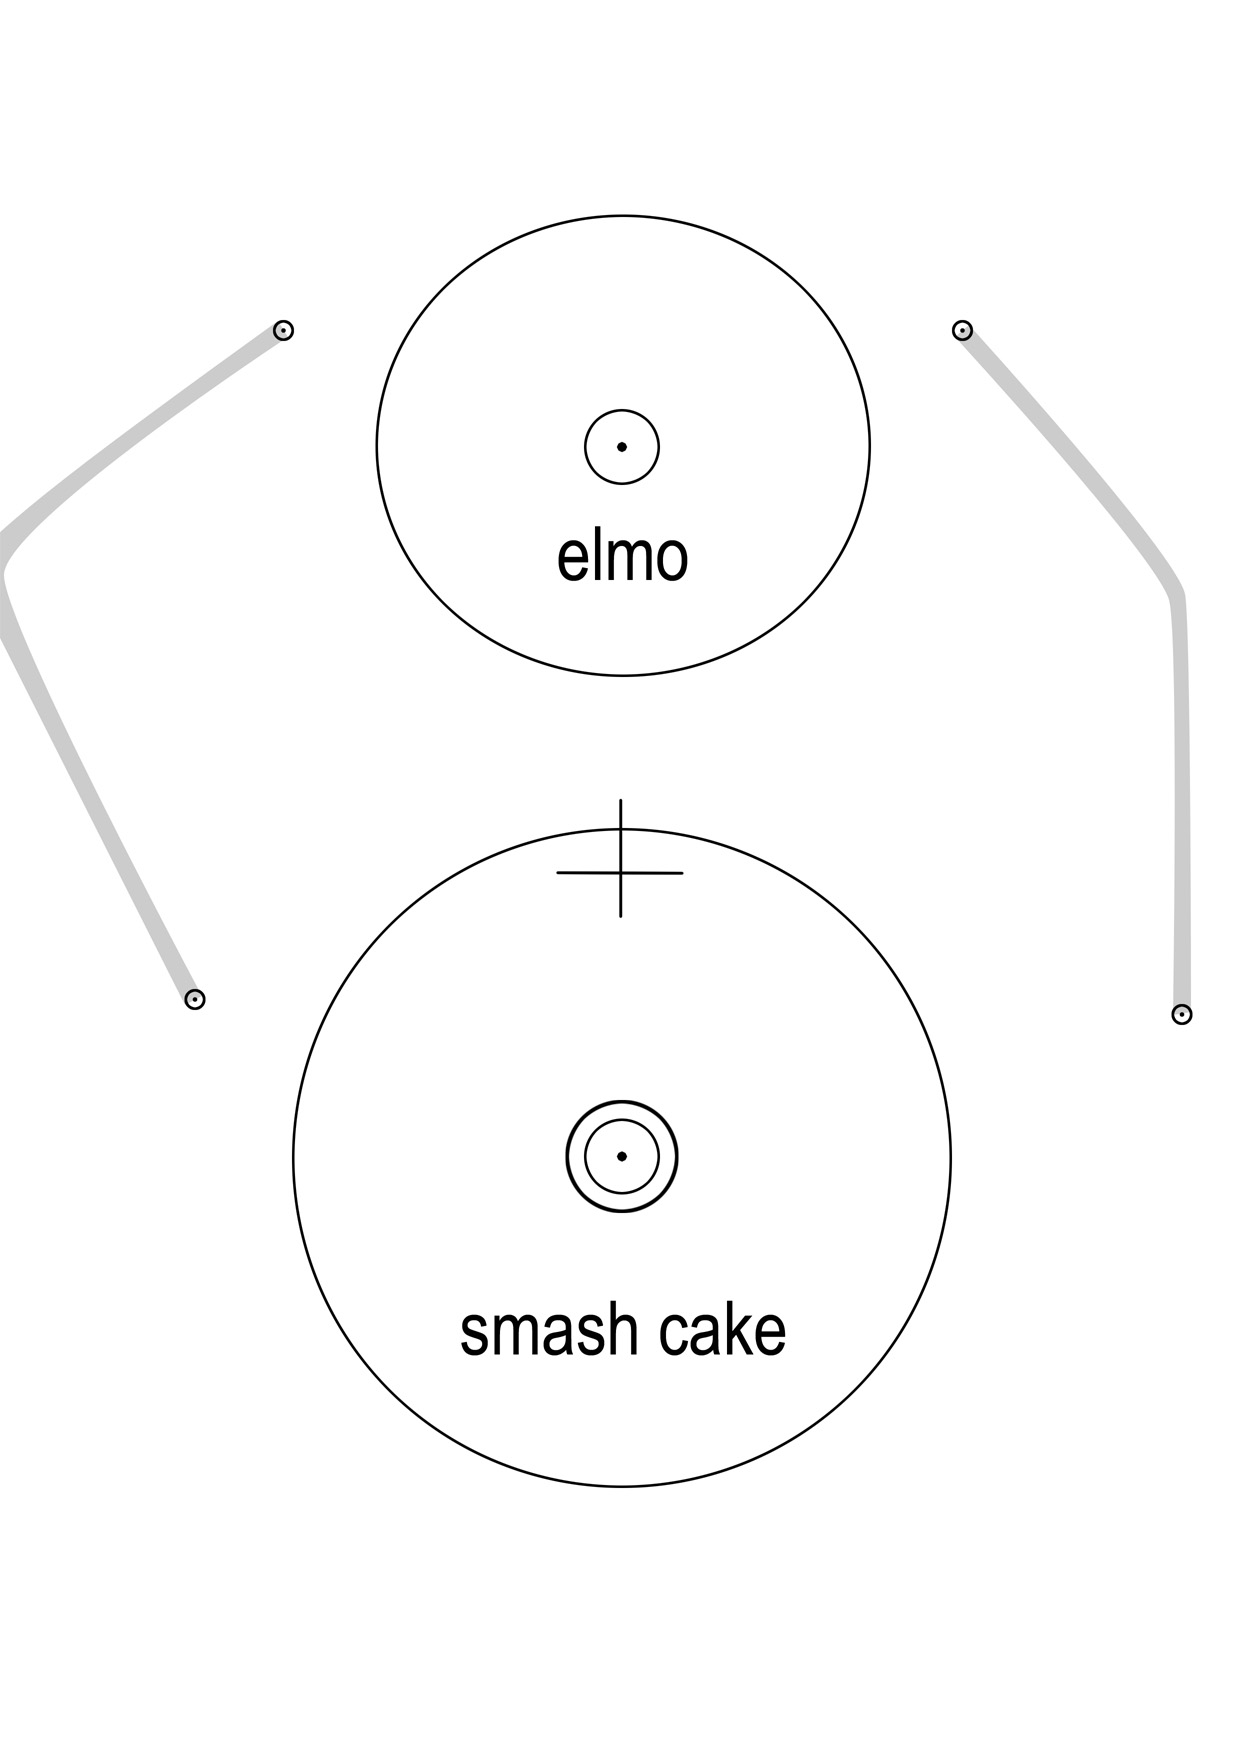
First step was to cut the 16mm MDF into a 40mm circle. I did this using a jigsaw, but you may be able to buy one ready made or get the hardware store to do it for you.
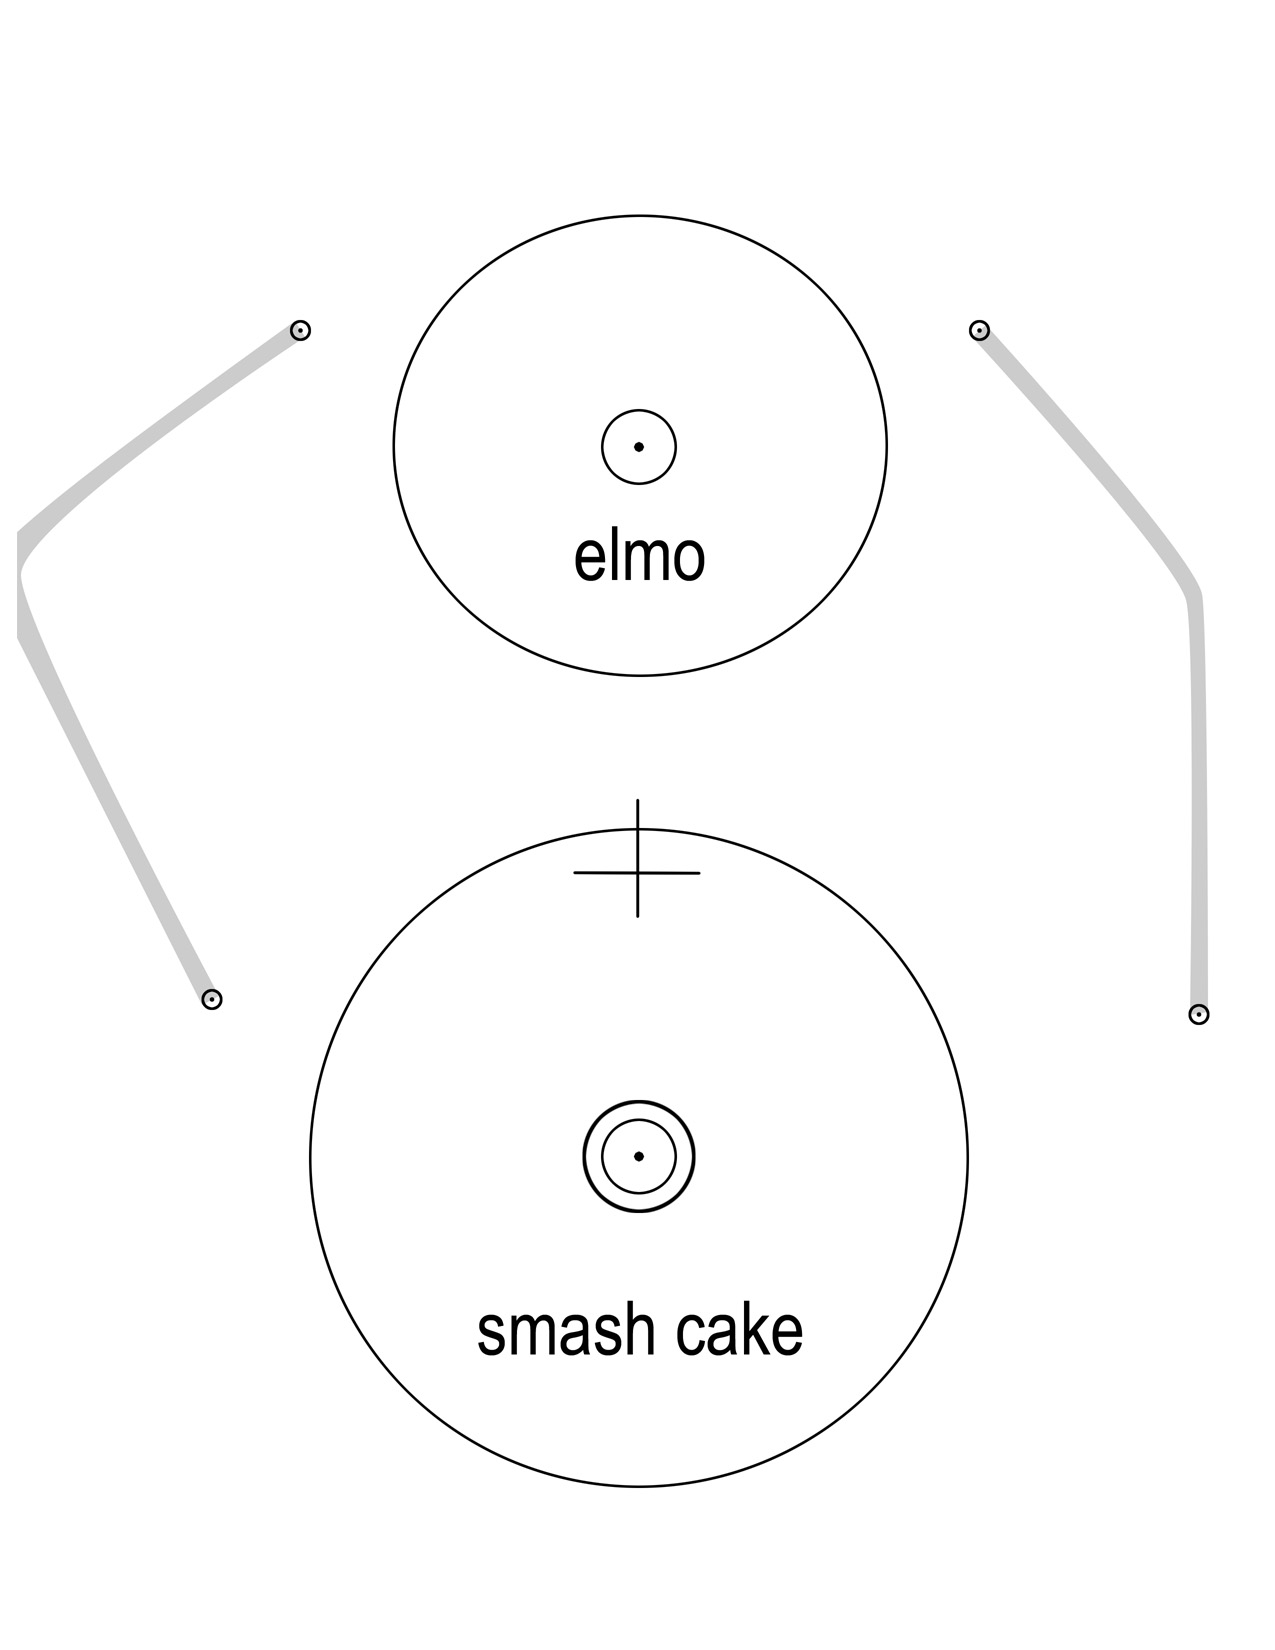
I printed the image on the right on an A4 piece of paper and taped it to the cake board with the cross at the center of the board (Click here for a letter sized version. Print both at 150dpi). I could then drill the holes I needed in the cake board using this as a guide without needing to measure it all up. It needs a 12mm hole for Elmo’s dowel, halfway through the board, a 12mm hole for the smash cake dowel, halfway through the board, and 2mm holes for the wire leg supports. In the middle of each dowel hole there should be enough of a hole through the board for a screw to come up through the bottom.
Note: Your cake board doesn’t have to be round like mine. It can be any shape as long as the circles and holes of the plan fit on it.
Next I cut the dowels to length. One 12mm dowel to 175mm long, one 9mm dowel to 100mm long and another 12mm dowel to 125mm long. I sanded the tips of the two shorter dowels into a sort of rounded point. I drilled a 2cm hole in the middle of each end of the long 12mm dowel, and in the flat end of the other two dowels (Before drilling it might be worthwhile testing the coat hanger wire in an off cut to make sure it fits very snugly in the hole. If not then try different sized drill bits until you find the best fit).
The PVC pipe is used to hold up the mini board for the smash cake. It slides down over the dowel and the mini board rests on it. I cut the PVC pipe on an angle so the smash cake would sit on an angle. You can do this too or cut it straight if you want the smash cake to sit flat.
I cut three disks from the 3mm MDF to make the supports for the head, the mouth, and the mini board:
- One 85mm in diameter to support the head. The 85mm disk needs a 2mm hole drilled in the center so the wire connecting the dowels can go through it as it rests on the larger dowel of the body.
- One 150mm in diameter to support the mouth. The 150mm disk needs a 9mm hole drilled into the center so it’ll slide over the head dowel.
- One 110mm in diameter for the mini cake board. The 110mm mini cake board needs a 12mm hole drilled into the center so it’ll slide over the thicker dowel, resting on the PVC pipe. If you want it to sit at an angle you may need to widen the center hole a little to accommodate that. You don’t want this one too tight either, as it’ll need to slide off when you remove the smash cake.
Finally straighten the coat hangers and cut each to 30cm. From one of the off cuts, cut a straight piece around 4 cms long.
Putting it all Together
 Start by sticking the 175mm long 12mm dowel into the Elmo hole in the board and secure it with a screw through the bottom. Position the 85mm disk over the top and stick the short piece of wire through the disk and into the hole in the dowel. Slide the 9mm dowel over the wire, and it should all be tight and sturdy.
Stick the other 12mm dowel into the smash cake hole and secure it with a screw through the bottom. Slide the PVC pipe over the dowel and slide the smash cake disk over the dowel.
Make any adjustments necessary to ensure it’s all sturdy and secure.
Next I used the image on the right, printed on an A4 piece of paper, as a guide for bending the coat hanger wire. Using pliers I bent the 30cm lengths of wire into shape following the top and side pics for each leg.
Once the wire is in shape place each end into the holes in the board. Adjust the bends if necessary to ensure a snug fit.
The stand is now pretty much complete. There should be a 150mm disk left over, but we’ll put that in position when we stack the cake. Make sure you wobble the head dowel a bit to make sure it’s in no danger of falling off, as the head will be quite heavy. The small disk will be enough to hold the weight, and the dowel should stop it toppling off.
Making The Icing
Hang on, we haven’t even started making the cake yet, what am I doing talking about the icing? Well here’s the thing about icing. Apparently when making icing, it needs to age if you want a rich deep color. Pastel colors can be made and applied straight away, but richer colors set in over the course of a few days. So I’ve read that it’s best to make the icing at least 3 days in advance.
The trouble with this theory is that it’s hard to know when you’ve used enough coloring. For my icing I may have used too much as he ended up darker red than I’d intended. I guess, like many things, it comes down to experience. For now I’ll tell you how much I used, and how much I’d try when I need to do it again and you can experiment a bit yourselves.
Butter Cream Icing using Copha (shortening)
The recipe is basically the same as traditional butter cream icing, replacing the butter with copha.
Beat 125g copha until thick and peaks form. Add 1 1/2 cups icing sugar half a cup at a time. Add 2 tablespoons of milk if necessary.
Generally I’ll add some milk for a crumb coat, but not much if any for the outer coat. But you can essentially use any combination of butter and copha to make up the 125g if you don’t need it to be quite so solid, or your prefer the taste of the buttery base.
When it comes to coloring icing and especially fondant, it’s best to use concentrated gels instead of the liquid food coloring available from most supermarkets. Liquid colors tend to alter the consistency of fondant when used in quantities enough for anything other than very pastel colors. So if you can find the concentrated gels online or in specialty cooking or cake shops then use them instead.
The other reason to make the icing early is the fondant covered blocks if you choose to include them. They can be made up to a week early (or a month early if using rice crispies for them instead of cake) so you’re not doing everything at the last minute. I make my own fondant, but for something like this it’s just as easy to use store bought fondant if you wish. But again, for richer colors it’s best to make it a few days before you use it.
As I mentioned in the previous blog entry, I’d decided to use copha as a base for the butter cream icing, instead of butter, mainly because the cake would be outside on a warm day, possibly even in direct sunlight. The reason for this is that copha has a much higher melting point, and is harder when it’s solid. With the change of party plans, the cake ended up in the shade on not too warm a day so I didn’t get to test my theory fully. But I can safely say that the icing ended up much more solid than traditional butter based icing, and I do believe it would have held up under the sun considerably better.
Marshmallow Fondant
Also known as MM Fondant. I originally got the recipe and instructions from this very informative site:Fondant 101.
I’ve adjusted the amounts to suit Aussie measures, so I use 500g marshmallows (2 packs of Pascall’s Mega-mallows), 1 kg icing sugar, and 2 tablespoons of water.
I think I ended up making 3 batches of butter cream icing for the filling and crumb coat, and 3 batches for the fur. I ran out of icing for the fur, so I’d recommend making 4 batches for the fur for an Elmo this size. The crumb coat doesn’t have to be as deep in color as the fur coat, so you can use less color in the crumb coat icing. For the fur icing I used most of a 1 oz jar of Wilton’s Red concentrated gel, but next time I’d try around 1/2 a jar, as it reached a point when mixing that it didn’t change color no matter how much gel I put in. I think next time when I reach that color I’ll stop and see how that goes once it’s set in.
For the fondant, one batch should be enough depending on the number of blocks and toys you want to make, and you can either buy ready made chocolate or black fondant for the inside of the mouth, or you can make up another 1/2 batch. It’ll be easiest to color the fondant as we go since each block doesn’t need very much colored fondant, and it’ll be best to have lots of different colored blocks.
Thanks for reading this far. In the next installment I’ll talk about making and carving the cakes, making and molding the rice crispy arms, legs, eyes and nose, creating the blocks, and possibly get as far as piping the fur.
Continue to How I Made an Elmo Cake… Part 2…


