How I Made an Elmo Cake… Part 2


In How I Made an Elmo Cake… Part 1 I talked about planning the cake, making the stand and making the icing. In this installment I’ll cover making and carving the cakes. Following that will be making and molding the rice crispy arms, legs, eyes and nose, creating the blocks and piping the fur.


Making The Cakes

As I mentioned last time, when planning the cake I set the size by using existing tins for the body, a pudding tin and a small pyrex bowl. These work well together as the rim of the bowl is the same diameter as the pudding tin. I used the same combination for the head of Serenity’s Dorothy the Dinosaur cake. Going from there it was just a matter of seeing what tin sizes would best fit the head.

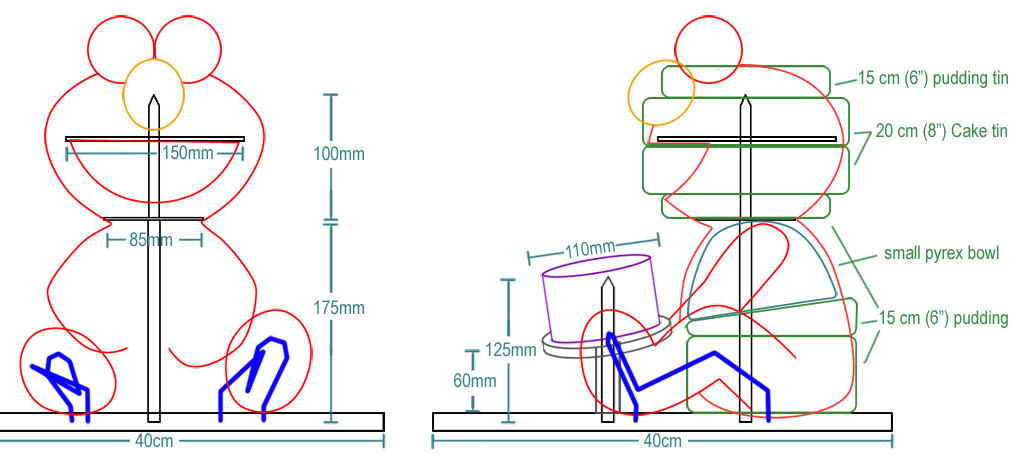
As you can see from the plan above, I ended up using a pudding tin, 1/3 of a pudding tin (cut into a wedge), and a pyrex bowl for the body. I used two 20cm cake tins for the head with 1/3 of a pudding tin on top and below. I used two 9cm (3 1/2″) cakes for the smash cake. So I would need:

  • 2 x 20cm cakes
  • 2 x 15cm (7.5cm or 3″ deep) cakes – pudding tin
  • 1 x pyrex bowl
  • 2 x 9cm cakes


Although the pudding tins are smaller in diameter, they’re deeper so they tend to use about the same amount of cake mix as a 20cm cake, and the pyrex bowl uses about 2/3 of a mixture. So I ended up making 5 batches. The left over batter from the pyrex bowl was enough for the 9cm cakes.

If you don’t have a small pyrex bowl you could also use a Dolly Varden tin, or another pudding tin if you carve the top of the resulting cake so it’s rounded. If you don’t have a pudding tin, or 15cm cake tin, you could also use 20cm cakes and carve them into shape. You would need 4 x 20cm cakes to make up the height of the body, and 3 for the head, so you’d end up needing at least 7 batches. So you can see using shaped tins not only means less work in carving, but less wasted cake (Not that the cake is ever wasted, between taste testing and cake balls) and less money spent on ingredients.

I had some leftover cake that I used to make the present and blocks, but if you want to make them out of cake (you can also make them out of rice crispies) you’ll need to make enough cake for those too. When we get into the blocks in detail I’ll give you the dimensions and some idea of how much cake you’ll need for those.

Freezing the cake

Freezing the cake makes it much easier to carve, and seems to keep in the moisture. I’ve had really good results from freezing the cake, people often remark on how moist and nice the cake is, even after a few days. Elmo was in the freezer, with the crumb coat done but only wrapped loosely, for 5-6 weeks alongside half a sheep and a big snapper. I thought the cake would be dry and not too good after that, but my sister recently told me how tasty and moist the the cake ended up. It all ended up being eaten which was a very nice surprise. After all, it’s no use making a pretty cake if it doesn’t taste good.

Once the cakes are baked and cooled, we’ll freeze them before carving. But first (after making sure they’re well cooled) cut the domed tops off them (called leveling), and put aside one of the pudding (15cm) cakes. Now here’s the tricky bit. I like to make a hole for the dowel, before the cakes are frozen, with a thin knife (a steak knife works well). It’s much easier to make the hole in freshly made cake than frozen cake. The tricky part of this is knowing where to put the hole. For the head it’s pretty straight forward, right in the middle. For the body it’s a bit trickier. Work it out from the plans where the dowel goes in the bottom and where it comes out the top, sometimes at an angle. From there make a hole in the bottom roughly heading towards the right place, and then a hole at the top heading towards the hole at the bottom. From there push the knife through each side until it comes through the hole in the other side. It doesn’t have to be a very wide hole, just enough that you can push the dowel through when the cake is frozen.

Once all the holes are in place, cut the thicker cakes into 2 or 3 layers (called torting). Take the pudding cake that was put aside and cut it into thirds. Put a hole through the middle of the two outer layers, and towards one edge of the middle layer (using the other pudding cake as a guide for the position of the hole). If the cake is firm enough, you can cut this middle layer into a wedge now, otherwise it might be easier to do it when it’s frozen.

Once all that’s done, double wrap each cake in plastic wrap and put them in the freezer for a few hours, or overnight.

Planning Your Time

Speaking of which, I just realized I forgot to mention in the planning stage about planning your time. Making these cakes isn’t a quick process, and you need to allow yourself enough time to make the cake, but not so much time that the finished cake is sitting around for too long before the party.

Now I don’t know how professional cake decorators do it, I’m sure being able to make all the cakes at once, having lots of fridge and freezer space and large quantities of icing makes the process much quicker and easier. I don’t have big enough bowls, enough cake pans or enough space in my oven to make all the cakes at the same time, and invariably need to re-arrange everything in the freezer just to squeeze cakes in. So here’s a plan I would use for this cake:

    Day 1

  • Make the stand
  • Make fur icing
  • Day 2

  • Make cakes
  • Make fondant
  • Day 3

  • Make crumb coat icing
  • Carve cake
  • Crumb coat
  • Rice crispies
  • Make eyes, nose, and start on blocks
  • Day 4

  • Decorate smash cake
  • Fur icing
  • Put eyes and nose on
  • Finish blocks and toys
  • Day 5

  • Party!!

This ensures that the actual cake stays frozen as long as possible throughout the process, and is thawed as close to the day of the party as possible. In this case only one day before, at which point it’s well sealed by the icing and will stay nice and fresh.

I usually make the butter cream icing the day of carving the cake, but in this case it’s worth making a few days before making the stand to let the color set in.


Carving the Cake

Ooh it’s exciting. This is one of the most fun parts of making these cakes. It’s also one of the most stressful, as you can so easily go wrong. I always have in the back of my mind that I may need to make the cakes all over again if I stuff it up and that’s where the stress comes from because as you can see from my timeline above, I rarely leave enough time to start again (without losing massive amounts of sleep).

So we need to start by making a few batches of icing to fill the cakes and provide the crumb coat. When icing a cake, it’s always a good idea to give it a crumb coat. A crumb coat serves a number of purposes. Firstly as it’s name suggests, it traps the crumbs so that if your covering the cake in butter cream icing, you don’t get crumbs all through it. For carved cakes, it seals the cake for when it’s put back in the freezer, so you don’t need to wrap it again to retain the moisture, and it also lets you smooth the surface of the cake, forgiving errors in your carving and building up areas that need it. For fondant covered cakes, it gives the fondant something to stick to so the fondant adheres to the cake well and doesn’t just slide off, and smooths the surface of the cake so you don’t have lumpy fondant.

Cream Cheese Frosting

Beat 125g softened butter, 250g softened cream cheese, and 1 tsp vanilla extract for 3 mins or until light and fluffy. Gradually add 4 cups (640g) of sifted icing sugar, beating until incorporated. Refrigerate for 1 hour.

Thanks to Bakerella I’ve just recently discovered cream cheese frosting/icing, which tastes just like cheese cake, and is delicious with chocolate cake. I’d recommend cream cheese icing to fill between each layer of cake, just because it’s so yummy. I would make chocolate icing for the crumb coat, maybe with some red coloring. The reason for this, other than it tastes nice, is that a darker crumb coat or undercoat is preferable so that any gaps in the fur coat look ok. If a lighter color was underneath, gaps would be very obvious and look a bit strange.

The great thing about the filling and crumb coat is you don’t have to make too much icing to start with, as if you underestimate, you can just make more. It’s not always as easy to do this with the top coat, especially because of color matching.

So you’ve got some icing ready, and your stand on the bench. It’s crunch time. Grab the cakes from the freezer. If you’ve got the disk and thinner dowel on the main dowel, take them and the wire off and place a small piece of plastic wrap over the top of the dowel, protecting the hole from crumbs.

Unwrap the pudding cake and push each layer down over the dowel, using the pre-made hole in the cakes as a guide for positioning. Put a nice thick layer of filling over the top of each layer before putting the next layer on.

Why the Wedge?

If you look at the plan, you can see the wedge of cake makes Elmo sit a bit forwards rather than sitting straight up. This is a more natural pose, so makes the cake look less like a cake and more like a character. It also allows the body to be further back, leaving more room for the smash cake without Elmo’s arms being absurdly long.

If you have already cut the middle pudding layer into a wedge, push this down over the dowel. Otherwise cut the wedge out and then push it down. Put a layer of filling on and then push the pyrex bowl layers over the dowel, making sure to sandwich a nice thick layer of filling between every layer. The top of the cake at this stage should be roughly level with the top of the dowel. If it’s a bit higher you can push down the layers a bit, or cut a bit off the top. If it’s a bit lower that’s ok too, you can build it up a bit with icing.

Now you can do some cutting. Carve the wedge to follow the contours established by the other cakes. You can then smooth all the edges so there’s a nice smooth transition between all the layers. There may be some gaps in the edges between the layers, but that’s ok, they’ll be filled with icing in a minute. Now grab a spatula or butter knife and start spreading the crumb coat icing over the surface. Fill in the gaps between cakes and make sure there’s a nice smooth surface over the whole thing. You’ll notice that, because the cakes are frozen, the icing hardens almost as soon as you put it on. This makes it even easier to get a smooth surface. It doesn’t have to be super smooth, just with the major gaps filled really, and a nice thin coating of icing over the whole thing.

Now take the plastic wrap off the dowel and put the wire, disk and thinner dowel on ready to support the head.

Put on the bottom layer of the pudding, cover with filling, then place on one of the 20cm cakes. Put a thin layer of filling on top then place on the large disk (You could make this out of cardboard, but because there’s a fairly large amount of cake being suspended I chose to use MDF just to be sure.) Another layer of filling on the disk and then the other 20cm cake, filling and finally the last layer of pudding cake.

Start carving the head into a spherical shape. Once that’s done, give the head a crumb coat taking extra care with the top back and sides.

To make the mouth, start at the top edge of the bottom layer of the head, cut upwards, making a wedge in the front up to the disk in the middle. Start smaller than you need, because you can always cut more away. If the mouth is too small, cut more, perhaps starting a bit lower if you want a more open mouth, or just deeper for a wider mouth. Once that’s done, crumb coat the inside of the mouth, making sure the disk is hidden and smoothed by icing.

And that’s the carving done. Looking at the cake as a whole, if you need to cut any more away, or build any areas up with icing, you can do it now. Check that the mini cake board for the smash cake fits over the front dowel. If the tummy gets in the way you can cut a bit more away there until the mini cake board goes on easily. Finally put the whole thing in the freezer to freeze back up before we add the rice crispies.

If you don’t have a freezer big enough to hold the cake board with the stacked cake on it, then you may need to arrange your time a little differently. I’ll talk more about that at the end.


I’m afraid that’s all I have time for in this installment. We’ll get onto the rice crispies next time…

As always, if you have any comments or questions please feel free to leave them below and I’ll answer them directly or in the next installment.


Continue to How I Made an Elmo Cake… Part 3

  • Vickt

    omg this is amazing! i love it, its hard but looks great! my sons bday is in april do you have a shop? within sydney?

  • http://www.zerogravity.com.au Jonny

    Thanks very much. I don’t make cakes professionally, just for family and friends. I’d be happy to help if you have any questions though?

  • Abigayle

    Just wandering if you could tell me a couple of things. Do you have the cake recipe for the elmo cake and would you pass it on as my son’s birthday is in April and i would really love to attempt this cake. I have no cake decorating experience but i am a chef by trade and am willing to give it ago. I was also wandering what size the small pyrex bowl was or could you use a pudding basin instead

  • http://www.zerogravity.com.au Jonny

    The cake recipes I use are:

    Butter Cake

    125g butter, softened
    1/2 teaspoon vanilla extract
    3/4 cup (165g) castor sugar
    2 eggs
    1 1/2 cups (225g) self-raising flour
    1/4 cup (65ml) milk

    Preheat oven
    Grease and line pans

    Beat butter, extract and sugar in a bowl
    Beat in eggs one at a time until combined
    Stir in flour and mil in two batches
    Spread into prepared pans

    Chocolate Cake

    1 1/3 cups (200g) self-raising flour
    1/2 cup (50g) cocoa powder
    125g butter, softened
    1/2 teaspoon vanilla extract
    1 1/4 cups (275g) castor sugar
    2 eggs
    2/3 cup (160ml) water

    Preheat oven
    Grease and line pans
    Sift flour and coca into medium bowl, add remaining ingredients.
    Beat on low speed until combined
    Increase speed to medium and beat about 3 mins or until mixture is smooth and lighter
    Spread into prepared pans

    You can certainly use a pudding basin instead of the pyrex bowl, just be sure to round off the top of it.

  • devanand

    its great ……….

  • SweetDesigns

    Your cakes are great! Thank you for sharing such detailed instructions… Your work has certainly inspired me… Thanks again.

  • John

    Jonny

    First of all let me commend you on such “AWESOME” work. 3D sculpted cakes have become a hobby of mine, and i just enjoy the whole creative process that goes into making them. What i would like to know is how did you create your scale diagram for the Elmo cake. I usually hand draw mine, but it looks like you used some sort of computer program to do yours. Also how did you create Elmo’s hair (please excuse me on this one for i haven’t read through your tutorial yet). Keep up the “GREAT” work!

    Thanks,

    John

  • http://www.zerogravity.com.au Jonny

    Thanks John,

    Icing the fur is covered in part 4.

    I used photoshop to clean up the diagrams because my sketches are pretty rough and not so easy to read.

  • Amanda

    what kind of cake did u use? does it matter if it is a box cake or home made?

  • http://www.zerogravity.com.au Jonny

    Hi Amanda,

    I make my own cakes, in fact the recipes are just a couple of comments above. But you can certainly use packet cake mixes. The only thing is that packet cakes aren’t quite as firm as the cakes I use so you’ll need to be a bit more careful when carving, and they won’t hold their own weight quite so well.

  • Danielle

    WOW! What an amazing cake!
    I stumbled on to your web page whilst surfing the net for cake ideas, as I would lke to try and make my sons first birthday cake.
    I am a dreadful cook and have made very few cakes in my time – but I have my heart set on making my sons birthday cakes, so have decided to start practising now in hope that I can master something presentable by the time his 1st birthday comes around in October.
    I am thinking of making a farmyard themed cake, so am interested in the marshmallow fondant recipe that you have included in your editorial. Do you think MMF would work well when moulding animals for the farmyard? Do you have any tips on storing the MMF? Once it has been made up, does it have to be used straight away?
    Thanks for your help & a very informative web page….I hope that one day my cakes will look 1/2 as good as your Elmo cake (probably wont happen until my son turns 18!)
    Cheers,
    Danielle

  • Amanda

    Thanks Johnny .I was thinking that might be an issue because i know box cakes tend to be less firm .I really appreciate your feedback thanks again

  • http://www.zerogravity.com.au Jonny

    Thanks Danielle,

    MMF is probably the best thing to use for creating your farmyard animals. There’s a definite knack to creating figures from fondant (sometimes called sugar paste) so getting some practice in is a great idea. There are lots of tutorials on creating fondant figures on youtube that you should check out too.

    MMF should last up to a year if double wrapped and stored in an airtight container in a cool dry place. I’m usually a bit lazy with wrapping mine, so it tends to dry up after a few weeks.

    Best of luck with your cake :)

  • Roxie

    Hey Jonny,

    This tutorial is AMAZING! So, is your elmo cake! I have looked high and low for the board you mentioned and can’t find it anywhere. I see you metioned cardboard…do you think that will work alright? I need to take the cake about 15 minutes from my house. Can you email me at roxanna_k@htomail.com

    Thanks Roxie

  • http://www.zerogravity.com.au Jonny

    Thanks Roxie,

    Cardboard really isn’t strong enough to hold up the weight. MDF is a lightweight fibreboard which is easily available here, but any fibreboard, or light solid wood will work just as well. You could use balsa wood for the internal supports, as long as it’s covered well to avoid splinters.

  • Violet

    Jonny,

    When you have covered the cake with the crumb cake frosting to put back in the freezer, do you wrap up the cakes with the frosting, or just put it back in the freezer unwrapped?

    thanks!
    Violet

  • http://www.zerogravity.com.au Jonny

    Hi Violet,

    If you make sure to cover the whole cake, the crumb coat is enough to seal the cake. However if it’s going to be in the freezer for a while (longer than a week), I’d probably cover it with plastic wrap.

  • Kristin

    Hey Jonny,
    I’m glad I stumbled upon your cake site, been trying to up my level of difficulty with cakes and I’ve moved on to carved cakes. Your cakes hail from a place most awesome. I’m planning on a Sackboy cake from Little Big Planet. Couple questions: Do you think that it would be ok to use rice crispies as the head to a cake body? (It’ll be for a small party so I’d rather not use too much cake.) Do you think it would need the 2 disks for support?

    Thanks!
    Kristin

  • Angela

    Thanks so much for giving detailed instructions…I am going to attempt this cake for a 2nd birthday. I was wondering if you could use pyrex bowls x 2 for the head and invert one on top of the other to make the head?
    Thanks,
    Angela

  • http://www.zerogravity.com.au Jonny

    Hi Kristin,

    Yes, rice crispies should be fine for the head. You would only need the bottom disk to support the weight of the head, keeping it off the cake body.

    Hi Angela,

    You could do that, but making a cake in a large pyrex bowl is really tricky, to get the inner cake cooked without way over cooking the outer bits. It’s actually far easier to make 4 cakes and carve them.

  • Lisa

    hello just letting you know we think your elmo cake is great and attemping to do it for my sons 1st birthday on the weekend. i’ll let you know how we go. Thankyou agian.

  • http://www.zerogravity.com.au Jonny

    Thanks Lisa, good luck :)

  • Stella

    Hi Jonny, your cake is the best Elmo carved cake I’ve ever seen!!I want to make one!!I have been reading your instructions..You are a genius!Oh my God you are sooo talented!!!Congratulations!!!

  • Carrie

    Thank you so much for you great tutorial. I am going to attempt to make this cake for my sons 1st birthday. He is in love with Elmo.
    Carrie
    Washington USA

  • Samantha Dyer

    hi there, wow you are sooo talented! I’m sorry to ask, I’m sure you’ve been asked a million times before, but what recipe do you use to make your crispy treats? I’ve tried to find it on your blog but I can’t seem to see it. Thanks very much!!

    My email add is samanthadyer@hotmail.com

    Sam

  • http://www.zerogravity.com.au Jonny

    Thanks very much Sam,

    The recipe I follow is in the very next installment of How I Made an Elmo Cake… Part 3.

  • Trishann

    I just wanted to say that I love your Elmo cake and I am attempting it as we speak. This is my second time doing a 3d cake. The first one was mostely rice krispies treats. I think it is pretty easy with your wonderful instructions. All I have to do now is put the fur on and the fondant. Wish me luck. I do have one question, how much of the red food coloring did you use. I have went through a bottle and half and it is more of a magenta than red. How do I get it red.

    Thaqn You :)

  • http://www.zerogravity.com.au Jonny

    I used a bottle of Wiltons paste and a splash of liquid food coloring which ended up more than enough. When I was making it the color was a mid pink, but after sitting for a while, when it warmed up being put on the cake it became a completely different color.

  • Lucy

    Hi Jonny this Elmo cake is a masterpiece never saw a Elmo cake this great! My son 1st birthday is coming up and I was wondering if you don’t mind how much money you spent to create the cake? Thank you so much for taking the time to read me :)

  • http://www.zerogravity.com.au Jonny

    Thanks Chris,

    I’m not too sure to be honest. I’d say given the size it would have been around $100, maybe a bit more. I remember the Lion King cake was over $200.

    Thanks for your question, it’s something I’ll keep track of for the next cake. I remember being surprised at the cost of ingredients when I first started making these cakes.

  • Revati

    Great Instructions. Thanks.
    Just wondering how do you cut this cake for serving. I am planning on making it for my Son’s 2nd Birthday but worried that it will fall apart when serving.

    Thanks,

  • http://www.zerogravity.com.au Jonny

    I cut the top half of the head to serve, then sent the rest home with my sister :)

    But if I was cutting it, I would then carefully cut the lower half of the head in half and move it from the support to a separate board or plate to cut. The body is fairly easy from there…

  • Shannon

    Your cake is amazing!! I had one question. How do you put the disk supports on the dowels to support the head?

  • Steven Alexidor

    I am not very superb with English but I come up this really easy to understand.

  • Darnell

    The cake looks great and I am planning on attempting it in 2 weeks. I have a quick question as I look at the cake diagram you have and im unsure if the picture is just drawn wrong or I have the cakes sizes wrong. From top to bottom the order is 15cm,20,20,15,pyrex,15(wedge)and then the bottom one is a 15 but alot thicker then the other 15′s so im a little confused. Are the other 15′s only half full or is the bottom 15 a couple stacked on one another?
    Thank you.

  • http://www.zerogravity.com.au Jonny

    Thanks Shannon. Check How I Made an Elmo Cake Part 1 for full instructions on how to make the support structure.

  • http://www.zerogravity.com.au Jonny

    Thanks Darnell. You only need to make two 15cm cakes. The first is used at the very base. The second one is cut into 3 for the wedge, the top and bottom of the head.

  • Melissa

    Hello there! I am attempting a very similiar elmo 3-d cake. First one!! ahhh!! Anyways, I heard from a couple people negative things about freezing the cake after the crumb coating is put on. They say it gets gummy and very sticky? Do I just not let it get to room temp when working on it to not let it get this way? I am using rice krispies for the head, legs and arms.The only cake will be the body. Any help will be greatly appreciated!!Thanks!!

  • Meredith

    Hello,

    What temperature do you preheat the oven to for the cake recipe above?

    This is totally awesome, by the way – my daughter is going to love it!

    Thanks.

  • http://www.zerogravity.com.au/ Jonny

    When I’m baking cakes I cook them at 150 degrees in a fan forced oven. I’ve found that 180 is too high for my oven, but experiment to see what works best for yours.

  • http://www.zerogravity.com.au/ Jonny

    Being gummy and sticky can be beneficial when you want fondant to stick to it, but it’s really up to you. If I’m covering it fondant I don’t like to let it get to room temperature as being partially frozen helps it keep its shape. If you’re using butter icing as the final coat, it’s less important, but you can still be a bit rougher with it if it’s partially frozen.

  • Angela

    I hope I haven’t missed this somewhere, but when I put the pudding cake on the stand it covered up the two holes for the wire for the legs. Do you carve the bottom cake to make room for the legs? I think this is the cutest cake I’ve ever seen! Thanks so much for sharing and for the detailed instructions.

  • http://www.zerogravity.com.au/ Jonny

    No that’s expected. You can just push the cake down over the wire, or cut a bit.